Using Live Effects on the Extrusion
The next step toward creating the finished effect uses Xara’s Live Effects. The two Live Effects that combined give this texture effect it’s look are Emboss and Displacement Mapping.
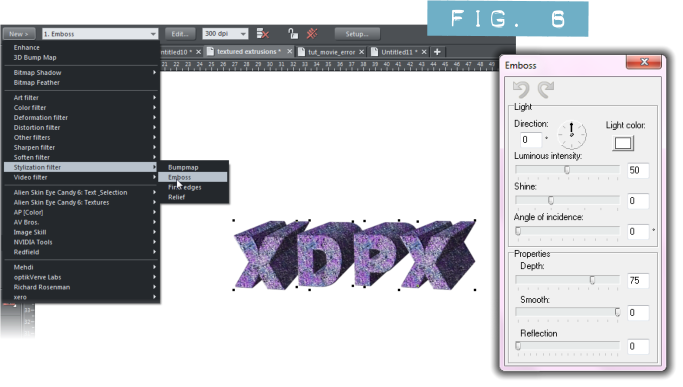
Before you start applying any of Xara’s Live Effects, group each extrusion with it’s texture layers so you have one group for each textured extrusion. Start with Xara’s Emboss filter. Select all of your texture/extrusion groups and then choose the Live Effect tool(the plug icon). Then click the New button on the InfoBar; choose Stylization filter and then select Emboss. In the Emboss dialogue you can set the light Angle of incidence, Depth, Smoothness, Shine, and Reflection. I encourage you to experiment with these settings and you can see the effects update live on the page! See my settings in Figure 6.

Figure 6. Embossing.
One thing I discovered with the Emboss Live Effect is that you can use the drop down menu, Resolution of effect on the InfoBar and type any value there. I rendered my embossing at 600 dpi and to produce a very fine image. Once you are satisfied with your embossing, lock the effect by clicking the Lock/unlock Effects icon on the InfoBar. Locking an effect helps speed your work because the program doesn’t have to render too many effects which slows things down.
Having text as separate extruded letters is necessary for the Displacement Map plugin to work properly. This is because the plugin renders from the outside in, meaning it’s kind of like cooking pancakes, if your pan is too hot (or the extrusion too large) the outside is overdone and the inside is still doughy!
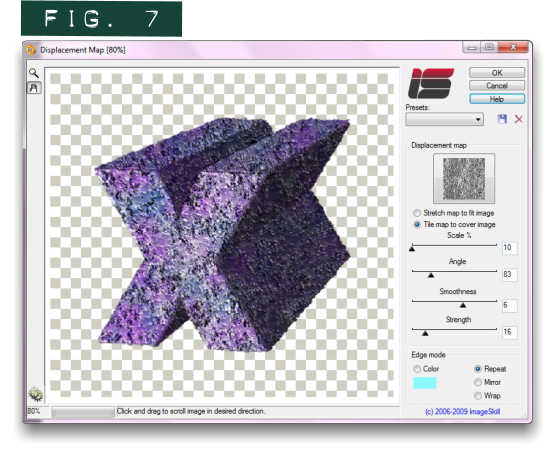
Make sure that all of your groups are selected and choose Live Effect tool again. From the New menu on the InfoBar select Image Skill and then Displacement Map and the Displacement Map dialog opens. The first thing you need to do is select the displacement map you want to use by clicking the grey-scale default image on the right side panel. (If you’ve not used the plugin before you may get an error message; just click OK to dismiss it.) A Browse for Folder dialog will open up; use it to navigate to the folder on your hard disk where you exported the desaturated purple_agate.png image. Click on the purple_agate.png thumbnail in the window that opens and it will be loaded and used to displace your image. The default settings will probably look nasty and again I encourage you to experiment with the settings. You will need to set the Scale % down low; I had it all the way down to 10. Find a balance with the Strength and and Smoothness settings that gives you a good displacement without over cooking the edges! See Figure 3 for my settings.

Figure 7. Displacement.
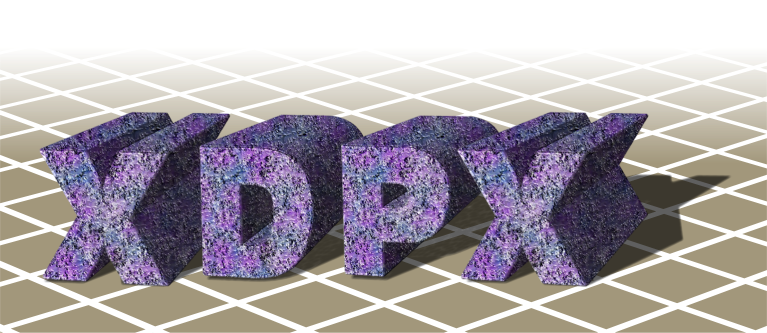
Once you are happy with your displacement click OK and voila! To add shadows, select the extra copy of the bitmap filled shapes we created and saved to the pasteboard at the beginning of this tutorial. Give them a flat black fill. Then position, skew, and arrange them on the page behind your the textured extrusions to create shadows and you are done!

The finished image of a textured extrusion.
I look forward to seeing all your textured creations on Talkgraphics !
(Angelize online), is the co-publisher of the weekly, Good Morning Sunshine! that has brought a smile to the faces of print and online subscribers for 14 years. She uses Xara products extensively in her work for her firm, SunWings Graphic Design. She loves to teach and share her love of Art though her YouTube channel, her contributions to The Xara Xone and and her work on Xara’s TalkGraphics forum as a moderator. You can drop her a line through her website or better yet stop by the Xara Xone forum on Talkgraphics and chat with Angelize there.
The tutorial Textured Extrusions including the artwork and the downloadable examples file are Copyright © 2012 Frances Proctor. All Rights Reserved.


