
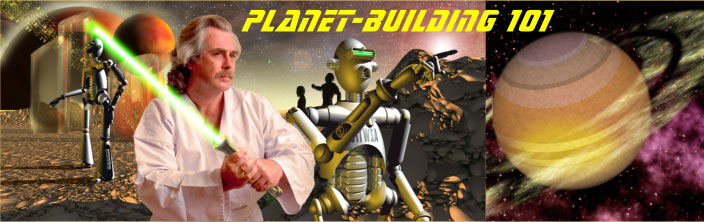
Planet-Building 101
By Gary D. Bouton
Before getting into this month’s tutorial—how to illustrate one of our solar system’s planets—the first thing you’ll want to do after launching Xara Designer is do a little UI customizing specifically to make the tutorial steps a little easier to perform. It simply makes working in Xara a lot faster when you don’t have to dig through menus to find some invaluable operations.
If you don’t own a copy of Xara Designer, you can still follow along. In fact, you can experiment without restrictions for a full month if you download a copy here.
Getting Some Color Swatches
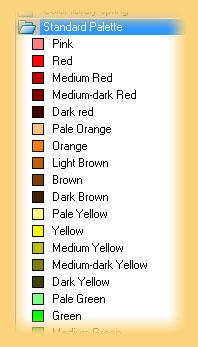 The color line at the bottom of the interface, by default, is populated with a palette called “Standard Palette”. These colors are always available in all documents you open (See Figure 1). To remove the colors (and be left with no colors on the color line), you click the Color gallery icon on the Standard Bar, right click over the Standard Palette entry and then uncheck “Show in Color Line”.
TIP: Colors on the color line that display as diamonds belong to a color library, stored in Xara’s Palettes folder. They cannot be deleted from the collection, and the only real way to globally change them, or create a library of your own is to go download XPal from smokingun.co.uk.
The default color palette might not have enough different colors to suit your needs, so the solution is to replace it. There are a number of ways you can get a workable color selection going on the color line, but the simplest one is to download a Xara document that already has a color palette going on the color line.
 After downloading BoutonPlanet.xar found in the June-2012-Tutorial-Resources, you can rename it anything you like and then open it in Xara.
- Choose File>Save Template. In the Save Template box, navigate to where you’ve installed Xara, then go down to Templates>ENG (or your regional language). Before you click Save, check the “Use as Default Template” box.
- Press Ctrl+Shift+O and on the View tab, make sure Delete unused color and styles when saving is unchecked.
- Press Ctrl+N or just click the New document page icon at far left on the Standard Bar.
- If your new, handsome color swatch collection isn’t now showing on the color line, click the Color gallery icon again, and right-click over the first entry, “Untitled”, then check “Show in Color Line” from the popup menu.
Colors that aren’t global, but instead belong to a document are displayed as rectangles on the color line. Because templates are considered to be local documents, there’s no real difference between picking colors from a library or using the same template over and over.
There are a handful of keyboard shortcuts it would be worth reserving some brain cells to commit to memory, and Ctrl+Shift+O for Options is a fairly intuitive one. However, if you use more than, say, 4 or 5 applications, shortcut keys can get to be a pain, and it’d be faster to put a button for Options on the Standard Bar, or even on the Toolbar.
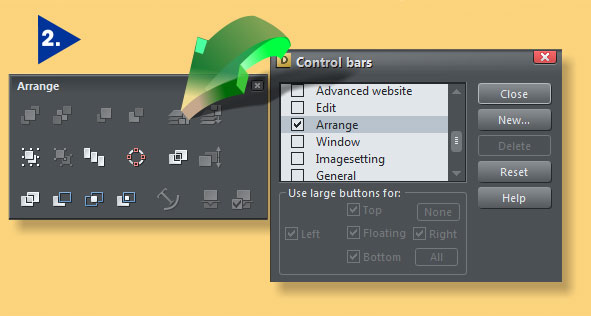
The Window>Control Bars command reveals a lot of useful and frequently used features in Xara; if you put a button within the interface, you might only have to dig through a menu once in a blue moon. Here’s how to access the “hidden” control bars and gather what you’ll want to use in the future, and for the following tutorials:
- Go to Window>Control Bars.
- On the Control Barbs scrolling main window, first find “Arrange” and check its box (See Figure 2).
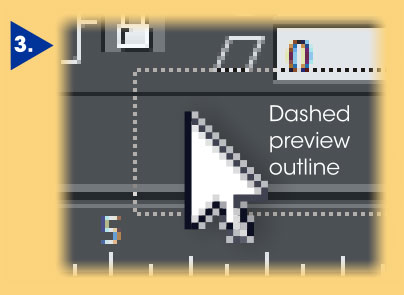 The bar will float in the UI, but you can dock it by dragging and hovering it near the Infobar or Standard bar until it highlights. The “highlight” lets you know it’s ready to snap into place, so just let it do its thing. (See Figure 3).
 Scroll the list down to “Button Palette” and then check its box. This palette, unlike others that require resetting, always keeps all available button commands and features on it—if you drag a button off the palette to put it on a tool bar, the button duplicates and remains on the button palette.
CAUTION: Don’t drag buttons off other palettes! ONLY the Button Palette self-duplicates. for example, if you drag the “Convert to editable shapes” button off the Arrange bar, it goes away. And the only way to get it back is to Reset all control bars in the Control bar dialog box. And you don’t want to do this after heavily customizing Xara’s workspace.
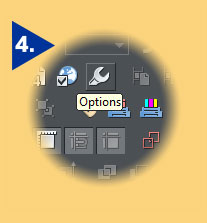 Hold the “magic” Alt key, which allows you to drag a button from the Button palette to other control bars.
- Drag the orange wrench button (Options), to the Toolbar (See Figure 4). Now, whenever you want to change, for example, the nudge distance for objects, or change Units or the page size, you’re only a click away.
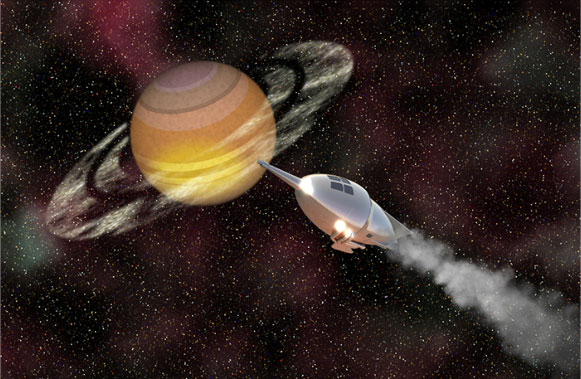
Making Saturn (rings not included)
Let’s go with a look for Saturn as astronomy photos display it; fairly flat front lighting, just a little off-axis lighting—a documentary instead of a beauty photographic treatment. First, a base drawing to show the stripes on the body of Saturn, and then we’ll get into some texturing and shading:
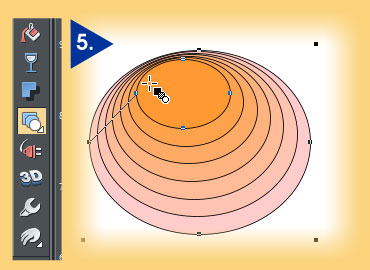 With the Ellipse tool, create an oval, a little wider than it is tall. Then with the Selector tool, drag the bottom right object handle up and left until it’s about 20% of its original; size; before you release, tap the right mouse button to drop a smaller copy of the ellipse.
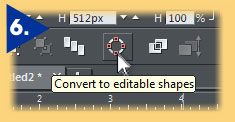 With the Blend tool and both ellipses selected, drag from the large shape to the small. The default of 5 blend steps is fine for this example (See Figure 5).
- Convert the Blend group to editable shapes. This can be done with the keyboard command of Ctrl+Shift+S, or if you have the Arrange bar visible, click the red circle button. Now you have 7 grouped ellipses (See Figure 6).
 Yes, this composition doesn’t look like Saturn yet; there’s a reason why you should create distorted circles to suggest bands on a heavenly body. With the Ellipse tool, hold Ctrl to constrain your shape to a perfect circle, and then drag a circle to fit within the group of ellipses. Duplicate it for later use, and move the duplicate off to one side.
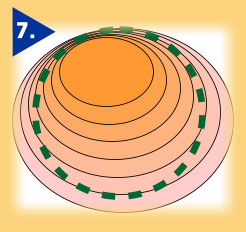
- Ctrl+B to put it to back, and the Ctrl+A to select all. Press Q to make the ellipses a ClipView from the underlying circle. The ellipses from within this view now look a lot like that planet out there (See Figure 7).
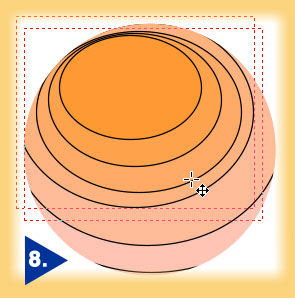 Now it’s time to give the “bands” unique colors and make them not so evenly spaced. With the Selector tool, Ctrl+click on an ellipse to perform Xara’s “select within” feature. Then move a band. Do this with the other ellipses until you have a ClipView shape that looks like the one in the figures here (See Figure 8).
 While an ellipse is selected within, recolor it by clicking a swatch on the color line. The Web Safe color palette contains a lot of muted tones that represent the bands on Saturn quite nicely. To put this library on the color line, open the Color Gallery, scroll down the list, and then right-click over the Web Safe colors entry. Choose Show in color line from the popup menu.
- Click on it while it’s selected to reveal the rotate/skew handles and then rotate it just a little counter-clockwise. (See Figure 9).
Shading Saturn
The planet now looks more like a pie chart on a Bad Hair day. Let’s do some shading now:
- Choose the duplicate circle you created earlier. With black fill and no outline (Shift+click the “No fill” area on the color line to remove the outline), choose the Transparency tool.
- Choose Circular as the transparency style from the drop-down list at left on the Infobar. This graduated transparency will be the inverse of what’s needed so…
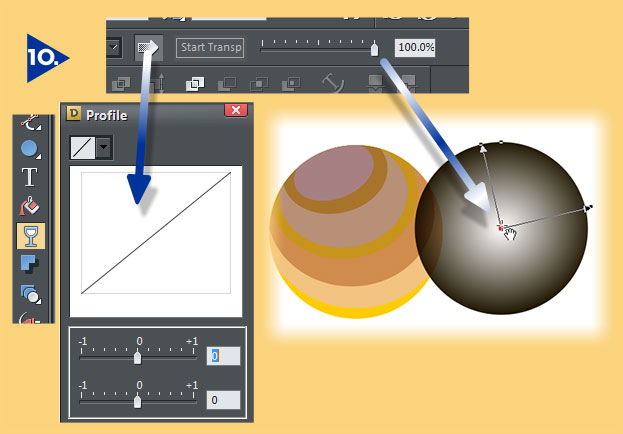
- Click the center control point on the transparency indicator line above the circle. Go up to the Start Transparency slider on the Infobar and drag the slider to 100% transparency. (See Figure 10).
Then click the outer control point and drag the slider all the way to the left (0% transparent). Set the mode to Stained Glass from the Infobar drop-down box. - Put the transparent circle on top of the Saturn drawing. The quickest way to do this is to select both objects (Ctrl+A), press Ctrl+Shift+L to bring up the Object Alignment box, and then click smack-dab in the center of the proxy box at the top of the box, where all the little colored shapes will then align both horizontally and vertically to where you clicked. Click Apply and then close the box.
- A profile needs to be assigned to the transparency to get it to favor transparency and not opacity. Click the right-facing arrow button on the Infobar to display the Profile box. Drag the top slider to the left. Done.
- Duplicate the circle: Ctrl+K and then move it over a little so you have a clear view of it.
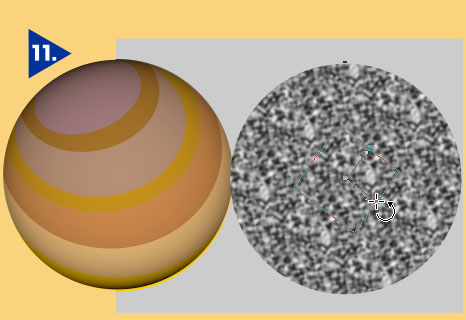 First, with the Transparency tool, set the style to No Transparency so you can see what you’re doing. With the Fill tool, Choose Fractal Plasma from the list on the Infobar’s drop-down, and then drag either of the fill’s outer control handles over the shape toward the center to make it appear grainy, as shown in Figure 11.
- Put the circle back on top of the Saturn drawing…use Align if necessary. Now press Ctrl+Shift+B to put this circle behind the transparent circle; as you’ll see, the effect works better in this object order.
 Back to the Transparency tool. Set the style to Fractal Plasma, and then drag a control handle to make the fractal pattern just a little different than its fractal fill.; Then choose Stained Glass as the blending mode (See Figure 12).
- Create an ellipse a little larger than the top ellipse of the Saturn drawing. Fill it with bright yellow, no outline.
- Add flat transparency, Bleach mode. you can adjust the amount of transparency to suit your taste later.
 Put it on top of the Saturn drawing, (See Figure 13) rotate it a little clockwise to suggest lighting from the lower left, and then drag the Feather slider to the right until the shading gently blends into the composition, adding a little roundness to the planet.
In the next section I’ll show you how to add rings to Saturn. I’m fairly good at this; some folks call me “Lord of the Rings”.
Others call me “pinhead”.
Make a stroke into a shape
There’s an invaluable feature in Xara that converts strokes into closed paths—the path you draw with dashed lines, arrowheads, all the Line Gallery presets—become closed paths. This means you can then create an arrow that has a gradient fill, you can scatter leaves by then ungrouping the converted shapes and using the Object Alignment function (press Ctrl+Shift+L and then use the “Distribute equi-spaced” options)—for unparalleled design ability.
- Choose the Ellipse Tool. Click the Radius Creation button on the Infobar. Drag a circle that is slightly larger and directly centered above the planet drawing in the file.
- Click the No Fill icon to remove the fill and then on the Standard Bar, set the outline width to about 64 points, nearly an inch.
- Hold Ctrl with the circle selected, and then drag the top right bounding box handle toward the center of the circle. When the preview shows you the new size is just slightly inside the original size, right-click and then release both mouse buttons to drop a copy of the original. You have two rings now, just like Saturn should have.
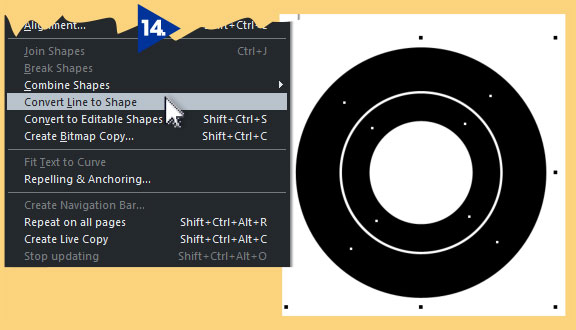
- Select both circle, and then choose Arrange>Convert Line to Shape. (See Figure 14).
- Press Ctrl+1 to add the two shapes into a single compound shape.
- Choose the Fill Tool. Choose Fractal Plasma from the drop-down list on the Infobar.
- Click the center control handle for the gradient and then click the white color swatch on the color line. Now click either of the outer gradient handles and choose a medium yellow on the color line.
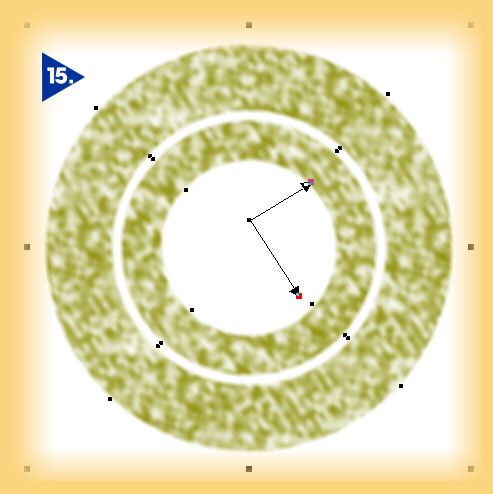
- Choose the Transparency tool. Set the style to Fractal Clouds. (See Figure 15).
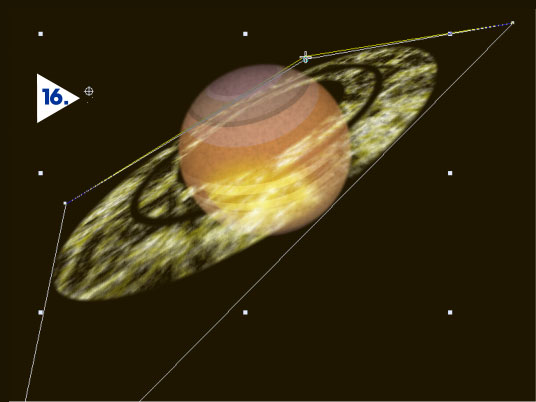
- Choose the Mould Tool. Click the Default Perspective button on the Infobar and then drag the top left, and then the top right handles toward the center of the perspective box. Then switch to the Selector tool (the Selector tool can be used to alter a Mould’s shape after one has been created). Click+drag just inside a corner handle to access the rotate function and then rotate the rings a little for a more realistic depiction of this celestial body. (See Figure 16).
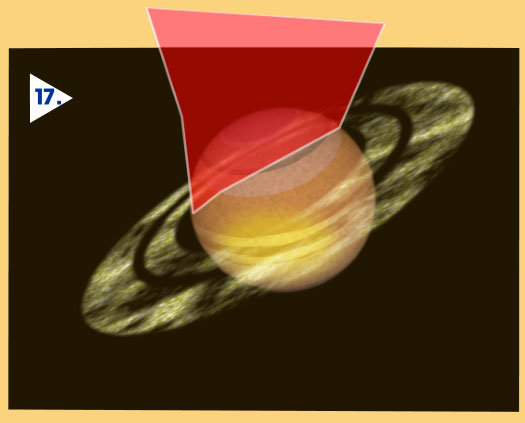
- Create a shape like that shown in Figure 17 to eliminate the ring portion of the shapes that should go behind the planet. Then select the rings and the new shape and press Ctrl+2 to subtract the top shape from the rings.
As a final touch or two:
- Consider creating a large rectangle of Fractal Noise, white on Black. Then Auto-Trace it to create scores of tiny star shapes. Sprinkle them against a black background for your composition.
- Select the Saturn group of shapes and then use the Feather feature to fuzz the edges ever so slightly.
- Seriously consider enrolling in Star Fleet Command.