


Creating a Space Beacon By Gary Bouton (“Gare” on tg)
Okay, I’m calling this object you’re going to create a “space beacon”, only because it looks science fictiony, like that monolith in 2001: A Space Odyssey, but it probably would make a nice star for a Christmas tree, and have other uses. What I’m trying to show in this tutorial is that there are some un or under-explored things you can do with Xara’s Extrude tool. It doesn’t have to be for extruding text alone!
Through these steps I’ll show you how to calculate depth with two shapes, so when they’re extruded, they have the same orientation and perspective, and can be put together to make a more complex object than merely extruding a single shape
Creating the Two Shapes
You’ll need to draw a square for the front axis projecting toward the audience, and a plus symbol, which can be achieved by adding two rectangles, like this:
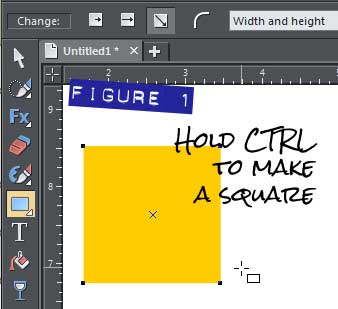
In a new document, choose the Rectangle tool, and then while holding Ctrl to constrain the shape to a perfect square, drag diagonally until you have a square that’s about an inch and a quarter (1.25”). If your dimensions are set up for pixels, this would be about 115px, displayed in the W and H fields on the Infobar. Give this shape no outline width and a golden color. See Figure 1. You need this specific dimension because you’re going to extrude the shape and the values I provide here later are intended to scale properly to the original size of the shape(s).
Right-click and drag a duplicate (release the mouse button about ¼ inch above the original).
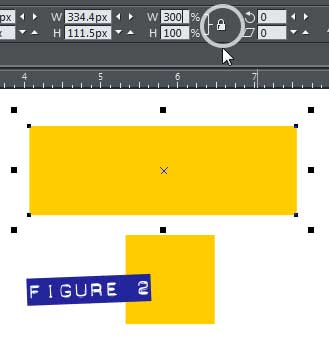
Select the duplicate and then on the Infobar, release the lock aspect ratio button to the right of the W and H number boxes. It’s locked by default, so simply clicking on it turns it off.
Type 300 in the W number box and then press Enter on your keyboard. In Figure 2 you can see that the new shape is 3 times wider than the original square, which by no coincidence is the width of the extruded vertical arm to the space beacon. Put the aspect ratio back in the locked state or you’ll get some unexpected (and unwelcome) surprises in the future.
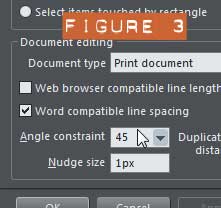
Press Ctrl+Shift+O to display the Options panel. On the General page, make sure the Angle constraint is a value of 90 or an even fractional amount of 90, such as 30 or 45. While you’re on the General page, also set the Nudge size to 1 pixel (0.01 inches if your choice of units is inches). Take a look at Figure 3. Close the Options panel now.
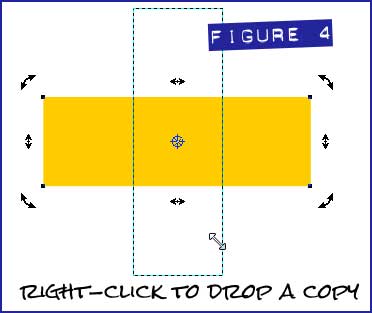
Here’s the tricky move to turn the rectangle into a perfect plus sign: select the rectangle and then click on it with the Selector tool to put it into Rotate and Skew mode. While holding Ctrl, drag one of the corner rotation handles (the upper right is good) until you see a preview of the rectangle perfectly vertical, in 90 degree opposition to its original orientation. Right-click now to drop a copy of the original. You don’t have to move a shape to drop a copy! See Figure 4.
Select both rectangles and then choose Arrange>Combine Shapes>Add Shapes.
Extruding the Shapes
Here comes the drama; in the next steps you’ll witness what happens when two shapes are selected and you choose the Extrude tool and then drag on the face of either shape. The result will not be perfect because the Extrude tool evaluates the depth of a shape using an absolute reference point and by relative scale—in English, the square will not be extruded as far as the plus symbol, but this is okay. Great Art takes some manual fussing every once in a while.
For the moment you might want to recolor the square so both shapes are clearly discernible when you align them.
Select both shapes (Ctrl+A works here) and then press Ctrl+Shift+L to display the Object Alignment panel. The little icons at the top are actually part of a working proxy box so you don’t have to choose what you want to do (in this instance) from the drop-down boxes. Just click in the center of the little blue and red and yellow and white guys, click Apply and then click Close.
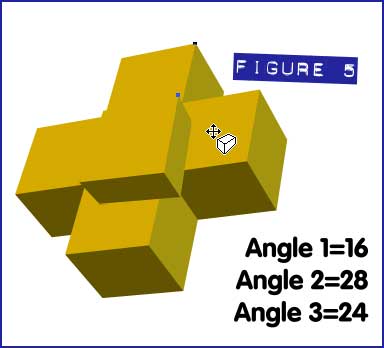
With the Extrude tool, and with both shapes selected, drag on either of the shapes, up and to the left to set the amount of extrusion and the direction the space beacon will be facing. Now I’d like you to have exactly the same results as I did in the figures here, because it’s a truly nice angle for the object, very dimensional. So you can go to the first drop-down box and choose Angle 1 instead of Extrude Depth, and then type 16, set the first drop-down to Angle 2 and then type 28, and finally set the drop-down to Angle 3 and then type 24 (hit Enter after you make a numerical entry). Now go up to the Bevel Type box and choose None because rounded corners on this space beacon would make it look like a Fisher-Price toy and not a massive high-tech space object. See Figure 5, and yep, we’re going to fix the front square in a moment.
Just so we’re all on the same page, press Esc to deselect everything, and then with the Extrude tool, click the plus symbol object. Set the left drop-down back to Extrude Depth and make sure the value is about 30 to 35. If it’s not, type the value in and then hit Enter.
Click the square in front to select it, and obviously it’s not as deep as the plus sign object. It has to have an Extrude depth of a little more than twice the plus symbol to look correct when centered over the plus symbol because the Extrude tool function is measuring from a common hypothetical depth point on the page (which is 2D, which is why it’s hypothetical).
Making a Manual Correction or Two
Because the shapes are angled across three dimensions, they’re posed in what’s called a ¾ view, exposing parts of all three sides. The front square is neither centered as it was originally, nor does it have a compatible extrusion depth. So we fix these minor hurdles as we leap over them, a contortion indeed if this was the real world:
With the front square (cube now) shape selected with the Extrude tool, you should probably click the original gold color on the color line to make the cube the same as the rest of the object.
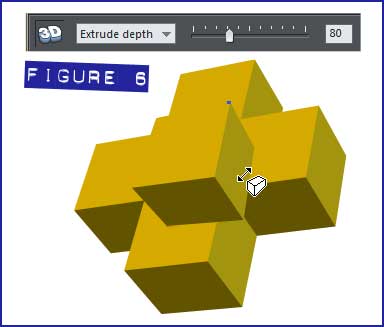
Type 80 in the Extrude Depth box on the Infobar and then press Enter. See Figure 6. Wait, Gare: shouldn’t this be 60 or 70? No: I tried these values and the front part didn’t look right, something to do with the slight perspective distortion that is the default for Extruded shapes. Software programs are science, and occasionally your artistic eye trumps science with art. They happily co-exist most of the time, by the way.
Use your keyboard arrow keys to nudge the cube (formerly the square) so it fits—in perspective—with the center of the plus symbol. Now, the cube might be perfectly aligned with the center of the plus symbol due to some of the manual adjusting we’ve performed and possibly because I’m showing you something not a lot of people try with this tool. You can try selecting the cube using the Selector tool, and then typing 101 in either the H or W fields on the Infobar to increase the size of the cube by what is technically called a “smidge”.
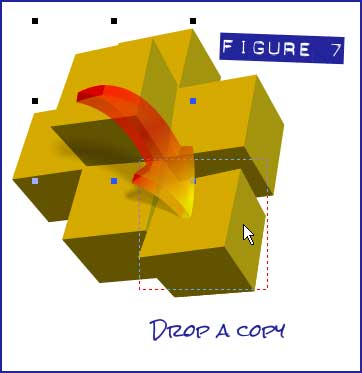
With the Selector tool, right-click and drag the cube down and to the right, and then release the right-mouse button to create a copy of the cube. See Figure 7. Notice that the duplicube looks misaligned in its current position? This is because this cube and the plus symbol have identical orientations along three axes in space, and they share the same perspective amount. The duplicube doesn’t belong in this space, we need a back cube to make the space beacon totally symmetrical in 3D, so…
With the duplicate cube selected, press Ctrl+B to put the cube to the back of the composition.
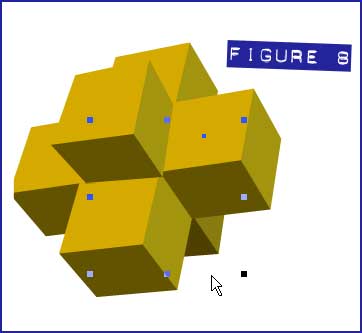
With the keyboard arrow keys, nudge the cube up and to the left until it looks right, or at least looks like Figure 8.
Lost and Found in Space
Group the pieces now, and just for fun, you might want to put a black rectangle behind the space beacon to get a feeling for some of the geometry beauty and drama (and terror) were this thing as mile across and hovering above Earth.
We can do better than a mere black rectangle to play a subordinate part of this composition. I can think of three options right off, two are free and the one is not—for putting a galaxy of stars behind the space beacon.
You need to generate noise on a solid white bitmap. This can be done in Xara, however, the result needs to be converted to a bitmap copy to continue filtering it because Noise is a Live Effects filter. You then need to blur the noisy bitmap to help drop out some areas and accentuate other pixels of noise. Then you use Levels to increase the black and the whites, adding contrast, create a bitmap copy and perform the Levels thing again. You then make the black areas white and vice versa using the Color Editor’s Light and Dark Contone feature. You make another bitmap copy and then use the Threshold Live Filter to make the blobby noise areas look like distant stars. It’s a lot of work, and programs such as Photoshop and Artweaver (which is free) can produce a decent starfield using fewer steps because they’re bitmap programs to begin with. But the procedure is always about the same: noise, blur the noise, choke the light and dark areas using a contrast procedure, invert the light and dark areas, then sharpen the bitmap.
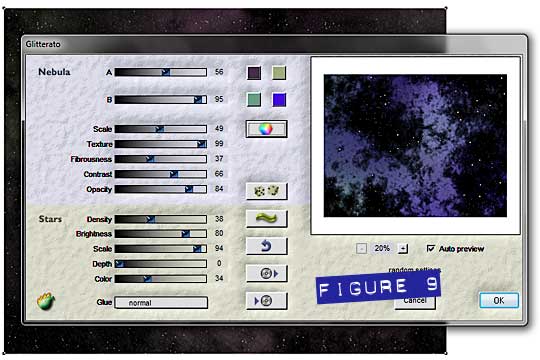
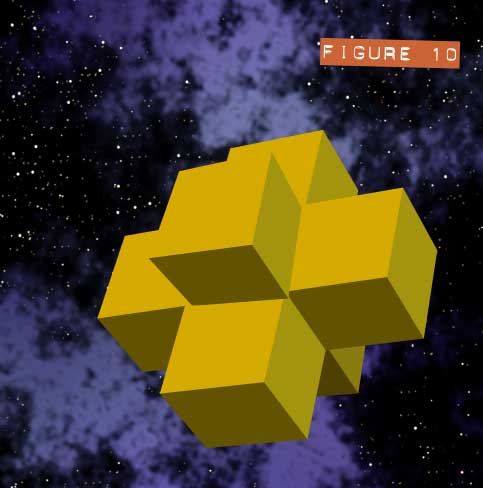
You can buy Flaming Pear’s Glitterato, which currently appears to be $29 US. Figure 9 shows the interface and this is a 32-bit plug-in so it needs to be hosted by the 32-bit version of Xara. All you do is create a rectangle, and then go to Live Effects after the plug-in has been pathed to be discovered by Xara. You have access to some nice presets, and invent your own cosmos by dragging on the density of stars, depth, brightness and then introduce some nebula fractal clouds. Figure 10 shows a Glitterato background and the space beacon.
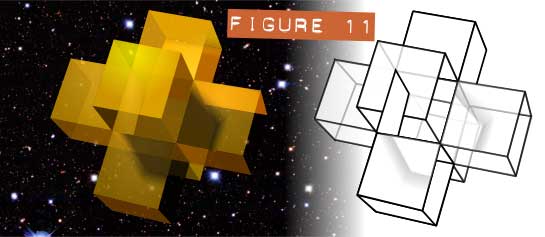
Now, if the space beacon seems a little flat and lifeless with this wellspring of cosmic activity behind it, you always have the option in Xara to manually trace over an Extrude object, and by making a vector copy, you can then do things with your artwork that cannot be done with the Extrude features. Figure 11 shows a manual trace I did over the object (it was rotated a little differently than you see in the other figures), and then I added linear gradients and some selective transparency. It’s an option you have, it means work and really using the eye and the brain and wherever the creativity part is located, but I feel this can be a rewarding endeavor if you have the time.
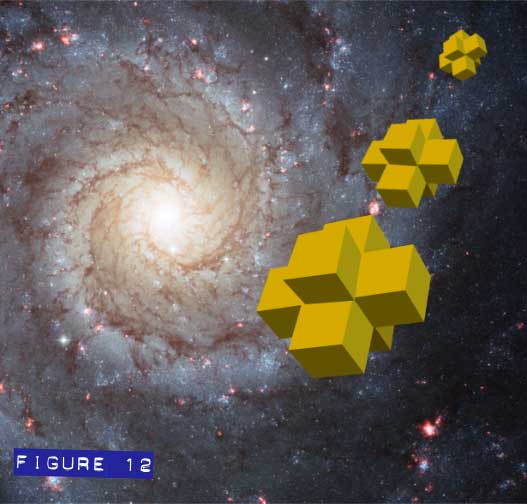
The Hubble Observatory offers free, high resolution images of our little corner of the universe. What better way to put a starfield behind your work than by using a radio telescope photo of a real starfield?
Figure 12 has got some serious sci-fi going on. The duplicates of the space beacon were just resized and rotated a little to give the appearance they aren’t copy and paste versions of the original.
I hope this tutorial has inspired you to try some unconventional stuff with the Extrude tool because it really does have a lot of capabilities. When I wrote the Xara Xtreme Official Guide, I showed how to make mirrored text—text whose reflection on the ground actually had the proper continuity by extruding text and mirrored text below the original at the same time. You can also change lighting on several extruded shapes simultaneously by dragging on one of the lights—the other lights will behave identically on their own.
Oh, finally: you can copy and paste the orientation and perspective of one extruded shape to another extruded shape. This is a terrific way to dimensionally align two shapes you didn’t have the foresight to extrude at the same time. You just press Ctrl+C with one object selected with the Extrude tool, select the other and then press Ctrl+Shift+A (Paste Attributes).
Be sure to post your beacons in the Talkgraphics.com thread, September 2013 Tutorial: Creating a Space Beacon.

has been drawing with traditional tools for almost 40 years, and with digital tools such as Xara for close to 20. As large a fan as he is a practitioner, Gary encourages others to express themselves artistically through his writing, the over 25 books on graphics he’s had published, through the videos and tutorials he creates for The Xara Xone, and through his online school, Exclamations. You can send him some email, visit his personal website, or better yet drop on over to the Xara Xone Forum on TalkGraphics and talk to Gary and the rest of the Xara community.
The tutorial Creating a Space Beacon including the artwork and the downloadable examples file are Copyright © 2013 Gary David Bouton. All Rights Reserved.


