


A Tips and Tricks Tutorial By Gary Bouton(“gare” on online)
Creating A Compass Rose-Style Star
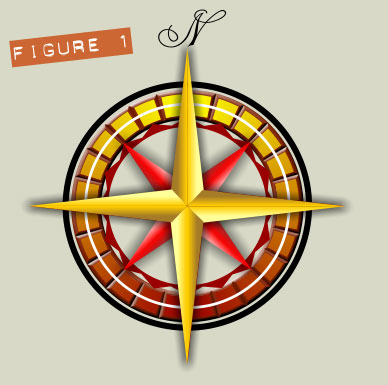
Monuments and nautical charts have had compass roses around them for ages. A compass rose is a “legend” that indicates the cardinal directions of North, South, East, and West (and sometimes only North), and historically they could be quite elegant and ornamental. Figure 1 is a drawing I did of a compass rose a few years ago.
Okay, now forget about a four-pointed polygon; I’m going to show you how to draw a five pointed star in the same elegant style using just about any version of Xara Designer or other Xara drawing software.
Creating the Star
The first thing to do is to open a new document in Xara, and then drag a horizontal guide from the ruler at the top of the page. This will be the baseline for the star shape, and you’ll be adding other guides shortly to align other elements.
-
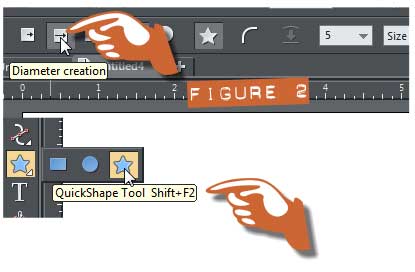
After you’ve dragged a horizontal guide onto the page, choose the Polygon tool from the QuickShapes group on the Toolbar. Set the number of sides to 5 and make sure the Starred shapes button is chosen on the Infobar.
-
Again on the Infobar, click the Diameter creation button (see Figure 2) so that the bottom of the star is affixed to your cursor. Let’s assume you have not changed the Angle constraint value in Options>General (Ctrl+Shift+O), but if you have, go there now and change it to 30 degrees.
-
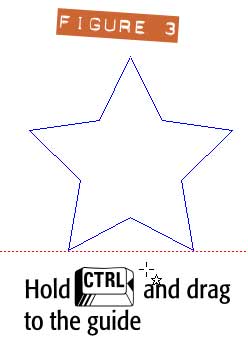
Hold Ctrl and then begin above the baseline guide, and drag downwards until the two bottom points of the star snap to the guide. Figure 3 shows the wireframe Quality view of what you should see onscreen now.
Filling the Star
One of the things that the Conical Fill offers in the Fill tool’s Fill type drop-down list is a good appearance for machined parts, a shaded overhead view of a corn silo, and a polished symmetrical shape such as this star. In the following steps, you’ll apply the conical Fill to the star, and then add color control points to the Conical fill’s direction handle. Then we’ll fuss with its appearance a little.
-
With the star selected, choose the Fill tool from the Toolbar and then on the Infobar, choose conical from the Fill type drop-down.
-
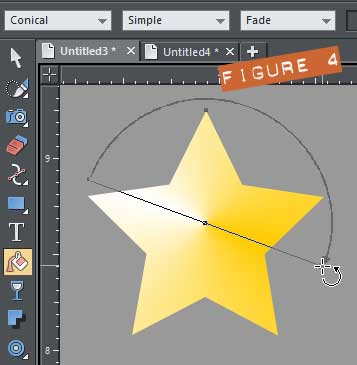
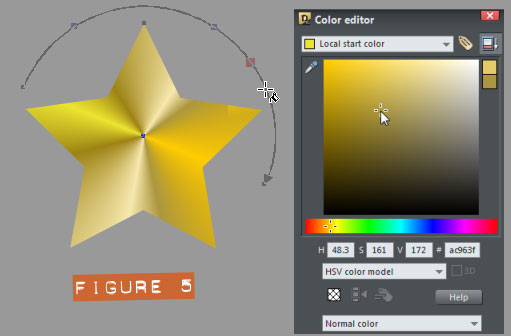
Click the color handle that has the arrowhead on it (this is the End Color in the Color Editor’s color list), and then choose a medium gold color. If you can’t find one on the color line at bottom, press Ctrl+E to bring up the Color Editor, set the color model to HSV and then mix up a nice medium gold color. The hex value at the right of the HSV value boxes could be #f1c111 to suggest this color. See Figure 4.
-
Click the opposite color handle and give this Start Color a dull brown such as a98a4b in the Hex (#) box on the Color Editor. Now keep in mind that this is your Compass Rose star drawing, so use the colors you see fit creatively to use. These values are suggestions based on trial and a lot of error.
-
Double-click using the Fill tool on the direction arc that connects the start and end color handles. This action adds a new color handle in-between the original ones. Choose a shade of color in the gold hue range, but drag the color field marker on the Color Editor around until you see a visible change to the star’s fill.
-
Repeat step 4 about seven or eight times, each time assigning the new color handle a different brightness and saturation.
-
Now, dragging the End color handle away or toward the center of the shape doesn’t produce much of an effect, however, try turning the fill clockwise or counterclockwise to accent the sides of the star. Stop when you’ve arrived at a good position for the fill, or until the amusement wears off.
-
Try dragging the color handles (except the start and end handles) toward one another, or away or just move their relative positions to create dramatic changes in the look of the star’s fill. Figure 5 handsomely illustrates the look you’re after.
Aligning the fill to the star
Now, the center of the Conical fill is not always in the center of a shape. It all depends on the shape, where you’ve dragged the centerpoint of the fill, and a couple of Mt. Olympus’ muses. And the effect in this tutorial will be spoiled unless the center of the conical fill is also the center of the star shape. So you do this:
-
Crank the View Quality slider on the Standard Bar to the left so you’re viewing the wireframe of the star.
-
With the Selector tool, click on the star shape. You will see an “x” at the original center of the star. Drag a horizontal and then a vertical guide to the exact center of the “x”. Zoom in if you need to. See Figure 6.

-
Look carefully at the intersection of the guides for a single dot that represents the center of the conical fill. If you can’t see it, drag the end color handle a little and the center dot will be easy to see. Now drag it to the intersection of the guides. You can set the View quality back to Excellent by dragging the slider all the way to the right.
Shading the Star
The classic shading of a compass rose is to make the left or right side of each of the five triangular sections a darker triangle. Now that you have the exact center of the star defined with guides, you can use the Shape tool to create one such shading shape, and then set the Angle constraint in General Options to one/fifth of 360 degrees: 72 degrees can be used to drop a copy to make the four remaining shaded shapes. Like this:
-
Choose the Shape tool (Shape Editor in previous versions of Xara), and then on the Infobar, set the line type to Make line, and the control point type to cusp.
-
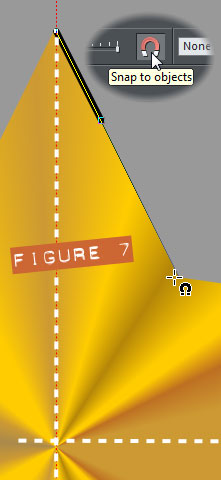
Part of the mastery of the Shape tool is understanding that it both makes path segments and it can reposition the control points that are at the ends of the segments. With Snap to objects enabled (click the horseshoe magnet icon on the Standard Bar), click close to, but not necessarily exactly on the top point of the star. To use Snap to objects, you’re ensured success if you lay down a control point by clicking and then dragging that point to the snap position as a secondary edit.
-
Click and drag the Shape tool to the indent in the shape to the right of your first click. You release the mouse button (you stop dragging) when the cursor changes its appearance to a crosshair with a tiny horseshoe magnet symbol to its lower right. Figure 7 illustrates this.
-
Click and drag to the intersection of the guides, and then release the mouse button when the horseshoe appears, indicating you’ve hit the snap-to point.
-
Click and drag to the first point you clicked to close the triangle shape and then click+hold the Shape tool on the first point, and then drag it to the top of the star, which completes its design and its position in the composition.
-
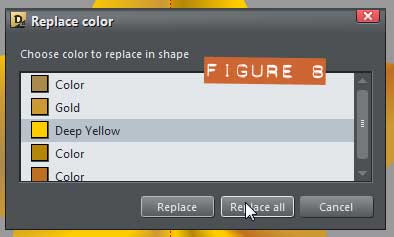
By default, new shapes take on the previously used fill, so this new triangle has an unexpected and unwanted conical fill. The quickest way to dispatch this mistake is to click on a solid color on the color line, which you can revise using the Color Editor later. You are presented a dialog box in version 9, shown in Figure 8, asking which colors should be replaced, or should Xara delete the whole lot of gradient color steps. Previous versions of Xara don’t ask; the multiple color gradient fill just turns to a solid color.
-
Try # 8f3f17 as the solid fill color using the Color Editor. It’s a little on the reddish side, but you’re going to stain the underlying colors and you’ll see that this color works, it’s harmonious.
-
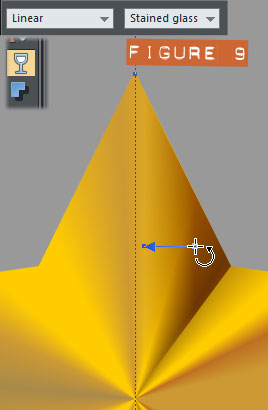
Choose the Transparency tool from the Toolbar. New to version 9, is that this button on the Toolbar appears to be a full glass; previous versions showed an empty glass. I’m messing with you here.
-
Set the Transparency type on the Infobar to Stained glass, and then drag your cursor from right to left, as shown in Figure 9, so the right side is opaque and the color fades to nothing on the left side. Play with the position of this linear transparency—try to allow the changing colors in the underlying conical gradient to work with, not against this shading.
Reusing your Embellishment
Although you might have to adjust the transparency direction after dropping a copy of the shading triangle shape, to complete this design can be done fairly quickly and easily from here in.
-
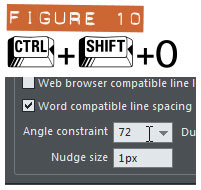
Press Ctrl+Shift+O to display Options. In the Angle Constraint box, type 72, as shown in Figure 10 Why? Because you’re going to rotate and drop a copy of this shape, a full rotational cycle is 360 degrees, and a 5 pointed star divided into 360 comes out very close to 72; some would venture it comes out exactly to 72. Click Apply and then click Close.
-
Press Esc to deselect everything. Now with the Selector tool, click the shaded shape (the triangle) twice, once to select it and again to put it into rotate/skew mode.
-
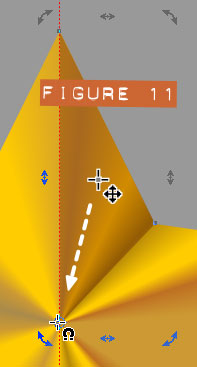
See the center point? With your cursor, drag it to the intersection of the guides on the page. See Figure 11.
-
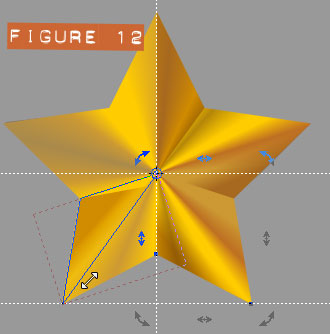
Hold Ctrl to constrain the rotation you’re going to drag, to 72 degrees, using one of the triangle’s outer handles. Drag the shape to the right until it snaps to the right arm of the star, then right-click, then release both mouse buttons to create a copy, in position, and still selected. And most importantly, the relative center of the triangle is still at the center of the star—this happens when a shape isn’t deselected.
-
Repeat Step 4 four more times. Figure 12 shows the work in progress.
-
With the Transparency tool, click on the four copies of the triangle, one at a time. The Transparency tool can be used to both select a shape and then refine its gradient. Set the angle of the transparency to the same linear angle relative to the original. That is, the first triangle transits from opaque to transparent from right to left. The right point on the triangle should travel from opaque to transparent from 5 o’clock to 11 o’clock. Working clockwise, the bottom right leg has an overlaid triangle that should transit from opaque to transparent starting at about 8 o’clock and ending in transparency at about 3 o’clock.
-
You did it! Now’s a very good time to find a pine tree and put your star compass rose on top of it. Invite friends, sing carols, exchange small gifts. Figure 13 shows the drawing in situ, and I think you now have the hang of creating a 4 point compass rose, or a 7 point, or whatever. Just don’t try to make a 13.375 point star.

Show off your work or ask questions about this tutorial in the Xara Xone forum on TalkGraphics.com.

has been drawing with traditional tools for almost 40 years, and with digital tools such as Xara for close to 20. As large a fan as he is a practitioner, Gary encourages others to express themselves artistically through his writing, the over 25 books on graphics he’s had published, through the videos and tutorials he creates for The Xara Xone, and through his online school, Exclamations. You can send him some email, visit his personal website, or better yet drop on over to the Xara Xone Forum on TalkGraphics and talk to Gary and the rest of the Xara community.
The tutorial Creating A Compass Rose-Style Star including the artwork and the downloadable examples file are Copyright © 2013 Gary Bouton. All Rights Reserved.


