


A Tips and Tricks Tutorial By Gary Bouton(“gare” on online)
Seven Things You Might Have Overlooked in Xara Designer
I’d like to offer the closest thing I’ve ever written to a true Tips and Tricks article, because mostly, I believe they’re a cheat. However, I have caught myself on numerous occasions exclaiming, “Wow! How’d you do that?”, and “Show me how to do this!” So in the interest of not being hypocritical for a little while, here are seven things I regularly do in Xara, call them a technique, an abuse of a feature, whatever—that you might not have known about. I wanted to make it 10 things we’ve overlooked because it makes a catchier headline, buy you guys are so good with this software that I doubt I can come up with three more!
-
Overlooked Thing Number One
Although when you’re typing, pressing Backspace erases your text, when you use the Shape tool and the Selector tool, Backspace and Delete do the same thing when a control point or shape is selected.
-
Overlooked Thing Number Two
You can zoom to selected control points. This is a very fast way to zoom into a drawing area when there is no small selected shape handy. With the Shape tool, select a control point or marquee select several control points and then press Ctrl+Shift+Z which is the shortcut to Zoom to Selected. See Figure 1.

-
Overlooked Thing Number Three
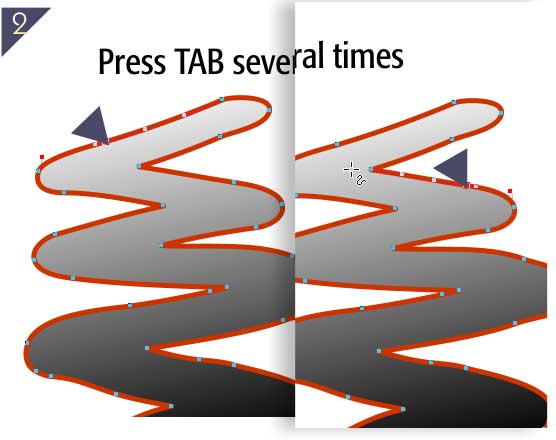
The screen auto-pans when you Tab through a selected control point. This is great for when you need to check a path very closely for imperfections or unnecessary control points. Zoom way into a control point, select it with the Shape tool and then press Tab. You are moved to the next control point along the path, and if this point isn’t on screen, Xara pans your view so you can see it. See Figure 2.
-
Overlooked Thing Number Four
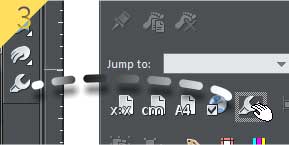
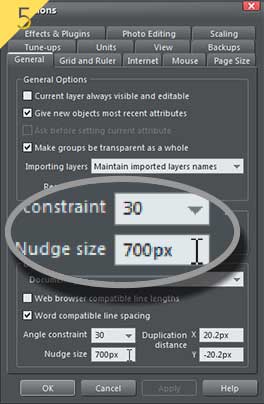
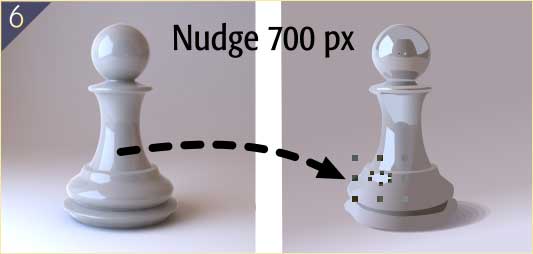
You might not use the keyboard arrows keys a lot for the action of nudging, but that might be because you need to go to Options and set the amount, and even though it’s a single step, you can make it a very quick trip to set the Nudge size. To get the Options tabbed dialog box one click away, you choose Window>Control Bars. Then put a check in the Button Palette entry, all the way down on the scrolling list, and a very large palette of almost all the commands appears. The Options icon is the end of a Crescent wrench and it should be on the fifth or sixth row, depending on if you resize the Button Palette. Hold Alt and then drag the Options button to the bottom of the Toolbar, as seen in Figure 3.
Done! Now, if you have an assignment such as tracing a photo, (Figure 4) you can set the Nudge size to a value a little larger than the width of the photo you’ve put on the page, and as you trace, you can nudge shapes to a new location (and back again for refinement), and everything stays aligned while you trace.
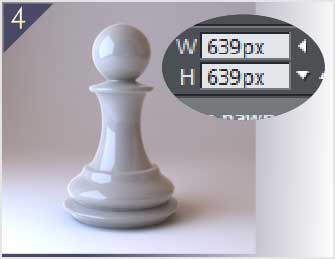
Download the Zip file and play with Pawn.xar if you like: here it is about halfway completed. You can add fills to your tracing, nudge the finished shape over, work from bottom to top and eventually your tracing will look pretty perfect.
-
Overlooked Thing Number Five
The Shape tool and the Pen tool both presume that you want to either make a closed shape, or an infinitely long series of paths connected by control points. That is, if you want to make several unconnected paths with either of these tools, it might seem hard to end the line and begin another. The solution? Press Escape, and the line is deselected and you can begin a new one. Actually, Escape is equivalent to other programs’ “Deselect All”. However, Ctrl+A produces the same result as most other graphics programs: Select All.
-
Overlooked Thing Number Six
The Context menu—that thing some of us call the contextual menu that pops up when you right-click over something, can be your best buddy in Xara, a wonderful shortcut to operations, if you’re precise and a little knowledgeable about precisely where you click, on for example, a control point on a shape.
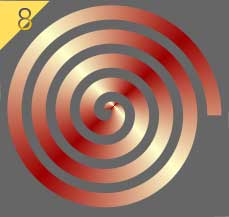
Let’s say you know where to find Dmitry Malutin ‘s Spiral Generator, a utility that runs outside of Xara to produce spiral curves you can just drag from the utility into a page in Xara Designer. Hint: it’s http://www.xaraxone.com/spxe.zip; download and install it. Once you have a spiral in a Xara document (open Spiral.xar from the Zip download file if you didn’t install the generator here), increase its outline width to about 28 pixels.
Now, in this scenario, you might want to split the spiral at a control point, to make two open paths. Contextually, with either the Selector tool or the Shape tool, you right-click over a control point. You then choose Break at Points, as shown in Figure 7. But don’t do that yet, because I want to show you something equally cool, but more productive in a day’s work, right-click over a part of the path, the curve between two control points (the Selector tool is easier to use than the Shape tool here), and contextually, you’re presented with options relating to the shape and not control points.

An interesting and invaluable command on the context menu is Convert Line to Shape—execute this Context menu command just be selecting it. Now, what you have on the page is truly interesting. A shape, a new closed path based on the outline of the spiral, and as a closed path it can be filled with anything. Except perhaps cheese. What you might want to try to create “Op Art” is to give the new shape a Conical gradient fill, from a light to dark, as shown in Figure 8.
-
Overlooked Thing Number Seven
You’ve got an idea for an elegant Desktop Publishing ornament. You also have planned this intricate, time-intensive bauble to the left and right sides are identical, in the interests of both symmetry and saving a little time. There’s a very fast way to mirror an open path, and almost as fast a way to join the two open paths to create a closed shape you can fill.
-
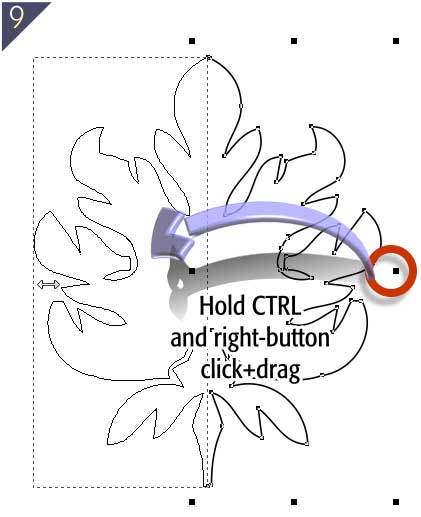
First, to flip an open path horizontally (you’ll know how to flip it vertically after reading this), you select the path with the Selector tool, then hover over the right, center bounding box handle as shown in Figure 9 until your cursor turns into a double-headed arrow, and then while Holding CTRL, hold the right mouse button and then drag the selection to the left. Release the right mouse button when the onscreen preview looks to be in the proper place, and you’ve mirrored the hard work you put into the right side of the design. So you can do this sort of thing from left to right, also, and up and down for vertical symmetry.
-
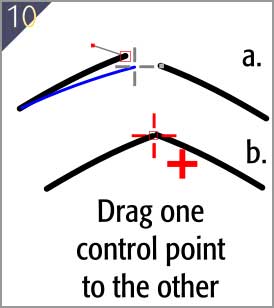
Now you need to connect the two lines in a way that the result is a closed shape. By the way, Arrange>Join Shapes won’t get you where you want to go. Closed shapes can be combined, but open paths will become a single path but the paths won’t join because their beginning and ending control points need to be manually joined, like this: With the Selector tool, select both paths; you can also press Ctrl+A to select all if these are the only two paths on the page. Then zoom very far in so you have an excellent view of both top ends of the two paths. Now, if you have the Show Object Edit Handles enabled—clicked-in, depressed (but usually cheerful) on the Infobar—you can continue to use the Selector tool to drag one path’s end control point to on top of the other path’s top control point. You can also use the Shape tool to connect the control points when both paths are already selected. See Figure 10. You have turned two lines into one when your cursor changes from a cross-hair to a cross-hair with a plus symbol next to it. The cursor is black if you use the Selector tool, and red upon completing the connection of you use the Shape tool
-
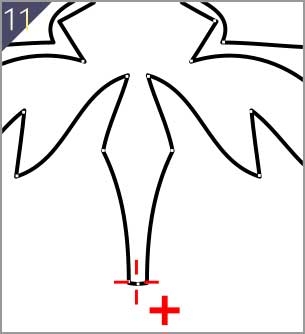
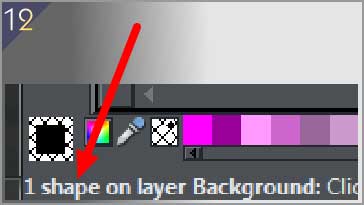
Repeat the previous step with the bottom two control points. These are actually the beginning and end of a single curved line, see Figure 11, and if you watch the Status line, the Line is described as a Shape once the little plus sign appears on your cursor, as shown in Figure 12. And now the shape can be filled and embellished, and the image in Figure 13 was less work than most Illustrator users would imagine!

I lied. I just found an eighth much-overlooked feature in Xara: the Shadow tool.
-
-
Overlooked Thing Number Eight
If you’ve played by dragging on a shape—filled or empty but with an outline width—with the Shadow tool’s cursor, it’s gratifying to get a soft drop-shadow (called a Wall Shadow in Xara) with no effort. But the Shadow tool can be used for goals other than making stuff look as though it’s floating slightly above the page!
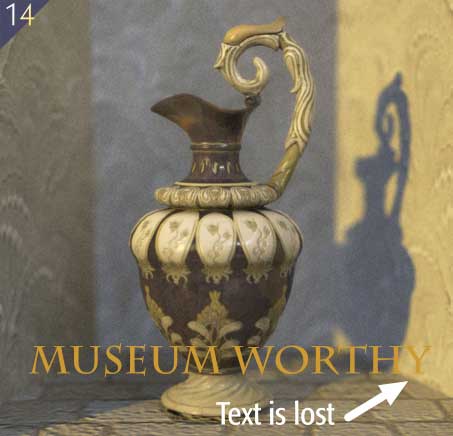
I had a design problem a while back: a client wanted a headline to go over a picture, but the picture has both light and dark areas in it, making the choice of color almost impossible for a typeface, as shown in Figure 14. Aha! Now my first inclination was to use the Contour tool, use 1 step, make the contour shape a light color, problem solved, But in an obvious, predictable and unsophisticated way, I felt. I’ve seen signs with dark text with a hairline of white at its edge, against a dark picture at county fairs and air conditioning trucks since I was in Kindergarten.
-
Open the Museum Worthy file in Xara. The text has been converted to curves because I’m not sure everyone owns Charlemagne Bold, and the underlying picture is locked, so all you need to do is follow the following steps.
-
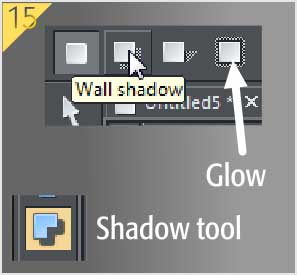
Select the shape that used to be text, and then choose the Shadow tool from the toolbar.
-
Go up to the Infobar, top left and click the Wall Shadow preset, not that you’re going to use it, but the Wall Shadow’s default color is black, and clicking this button is an easy and lazy way to make a black soft shape around the text object. See Figure 15. Now click the Glow button and instead of default red, the glow a sort of Gaussian blur soft edge effect you also can get with the Feather feature in Xara, is now black and you can begin to see how a soft dark areas just outside the text can help legibility of the text without resorting to a Contour.
-
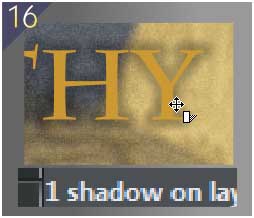
In Figure 16, I’ve zoomed way into the “Glow” shape in the composition because I want to select it, but not the text. With an active selection going on in a composition, you can also press Tab a few times and watch as each shape—and eventually the Shadow shape—becomes selected. But if you’re careful, and watch the Status line to see what’s selected, you can indeed select the shadow on the page and now you’re all set to modify it without messing up the color of the text.
-
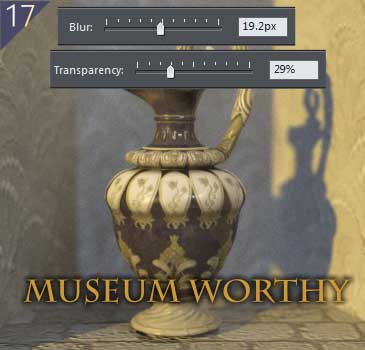
Up on the Infobar, set the Blur value to about 20pixels for this size illustration, and then set the Transparency to about 30%. Figure 17 is a little crowded, but I think you can clearly see that the shadow effect provides good separation between the medium brown text and the shades of brown in the underlying picture.
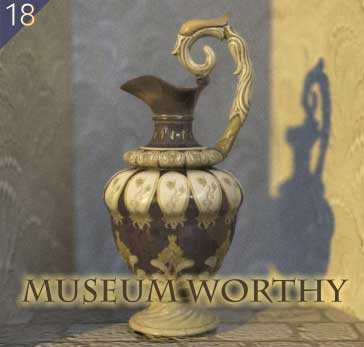
Now that you know how to use the Glow option of the Shadow tool to do more than make things glow, you can use it in the future to separate text, symbols or other shapes from their background with a minimum of visual distraction. In Figure 18, I’ve done an inverse effect: very dark brown te3xt separated out with a very light, warm glow.
I hope I’ve brought something to the party this month, and that you’ll remember two things: these little-recognized features can speed up your work in Xara, which is already a sizzlingly fast program. And that there are probably several dozen more things you might have not tried out in Xara, so by all means, seek out the unobvious and share what you’ve discovered right here on TalkGraphics!
-
Discuss or ask questions about this tutorial in the Xara Xone forum on TalkGraphics.com.

has been drawing with traditional tools for almost 40 years, and with digital tools such as Xara for close to 20. As large a fan as he is a practitioner, Gary encourages others to express themselves artistically through his writing, the over 25 books on graphics he’s had published, through the videos and tutorials he creates for The Xara Xone, and through his online school, Exclamations. You can send him some email, visit his personal website, or better yet drop on over to the Xara Xone Forum on TalkGraphics and talk to Gary and the rest of the Xara community.
The tutorial Seven things You Might Have Overlooked in Xara Designer including the artwork and the downloadable examples file are Copyright © 2014 Gary Bouton. All Rights Reserved.


