


A Tips and Tricks Tutorial by Frances Proctor (Agnelize online)
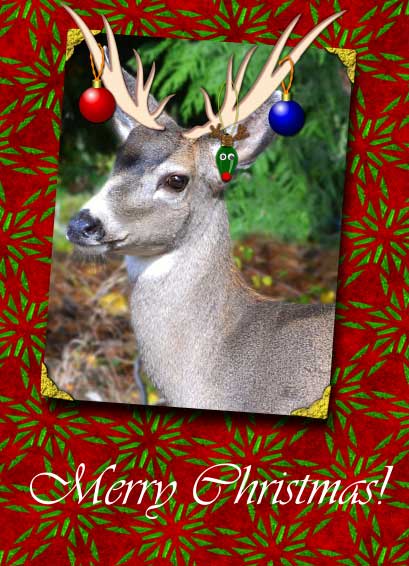
A Raindeer Christmas Greeting Card
First of all, the title of this month’s Tips and Tricks isn’t misspelled! The photo you’ll be working with in this tutorial is not actually a reindeer &emdash;a caribou, as they are often called in British Columbia. This young fellow is a blacktailed deer, which are quite common in the coastal rainforests, so I’m calling him a rain deer…and you can, too if you’re so inclined.
Now let’s get cracking because the Holidays are almost upon us. This quick, easy digital scrapbooking tutorial is designed for beginners, but all skill levels are invited to play along.
If you haven’t already, download the zip file and unpack it and you’ll find a seamless foil pattern, a seamless black and white noise texture, and the photo. Drag and drop all of these into a new Xara document &emdash;make sure Xara isn’t maximized and then you can drag the file icons in and onto a new page. Alternatively, you can choose File>Import (or press Ctrl+Alt+I) and choose the files in the Import dialog box.
Once the pattern and noise images are in the document, you can delete them off the page (click on them with the Selector tool and then press Backspace), and they are still held within the file and can be accessed from the Bitmap Gallery.
Decorating the Card
Let’s get started!
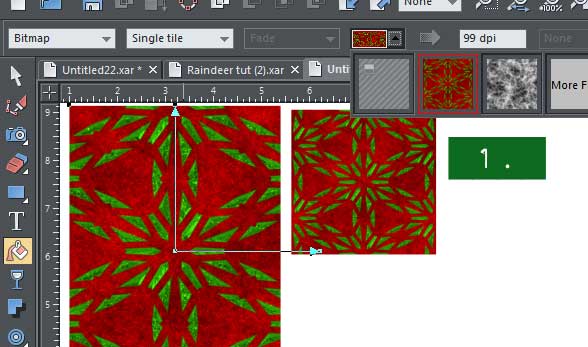
- Draw a rectangle the size of your finished greeting. Choose the Fill tool from the toolbox and then choose Bitmap as the type of fill from the drop-down list on the Infobar. Click the Bitmap Name flyout and then choose the red and green pattern. Choose Repeating Tile from the Fill tiling drop-down list on the Infobar, and then you can use the object’s control handles to scale and rotate the pattern within the rectangle. See Figure 1.
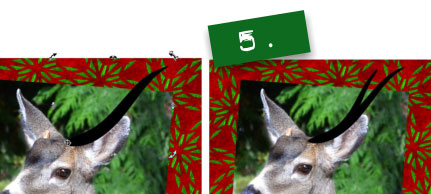
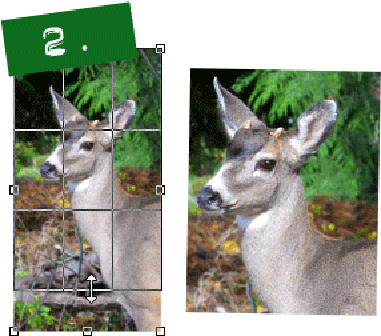 With the Selector tool, double click the Deer.jpg image to load and display the photo tools. You can now pull the edges inward to crop it and you’ll even see a “rule of thirds” guide appear while you are doing this. Crop the image for the purposes of this exercise to the head of the deer. See Figure 2.
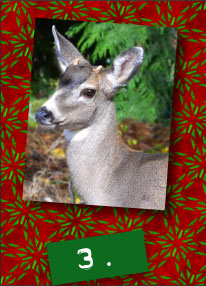 Once you have the photo cropped you can place it on top of the patterned background. Arrange it artfully and make sure to leave some space at the top and bottom. Use the shadow tool and reduce the blur and transparency and pull the shadow in a bit. This will give the photo a layered look, as shown in Figure 3.
 <
<
Growing Antlers (on the deer!)
You’ll notice this young deer has just the beginning knobs of antlers starting to grow so next you’ll see how to give him some stick-on antlers and jazz him up for Christmas, scrapbooking style!
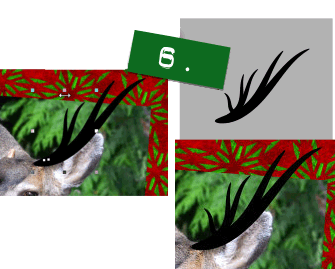
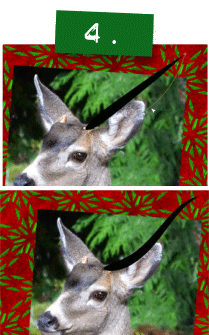 Start by selecting the Freehand/Brush tool, open the Lines Gallery (press Ctrl+F9), and open the Line Stroke Shapes/Pressure Profiles folder by double-clicking its title. Choose the Dab profile, the first choice on the fifth row. Use the Freehand tool to create a line starting at the right antler knob and go right up and out of the photo. Edit the line with the Shape tool on the toolbar to give it a nice flowing arc. See Figure 4.
- Clone (press Ctrl+K) the line and with it selected, choose the Selector tool, and the rotation handles should be visible. Click the Show Rotation Handles button on the Infobar if you can’t see the handles bounding your antler selection.
- Pull the centre rotation point (the crosshair in the middle) down to where the line begins at the deer’s head and rotate just a bit and offset slightly. With the cloned line still selected, use the Shape tool and select the node on the outer end and move it down and to the left slightly. See Figure 5.
These 2 lines will create the first fork in the antlers. A black-tailed deer’s antlers are forked, not branched, so although this is a cartoonish sticker style, you’re still sort of following Mother Nature.
 Select both lines, right-click and drag, and then tap both mouse buttons before releasing both buttons to duplicate the lines; this is called “dropping a copy”. Scale these duplicates down a bit so they are smaller and while keeping them selected rotate and skew. Now you should have an antler with two forks. Sometimes these fellows will have a small single point near the base. To create that, duplicate the smallest line and make the duplicate a bit smaller by scaling the line using the control handles surrounding the selection. Flip it to face the other way using the mirroring buttons on the Infobar, and align it with the rest of the antler as shown in Figure 6.
 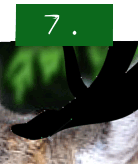 With the Selector tool, marquee-select all the lines. Go to the Arrange menu, and then choose Convert Line to Shape. You will now have 5 separate shapes, with the shapes still selected, use the keyboard shortcut Ctrl+1 to combine the shapes into one single shape; the “long way” to this operation is Arrange>Combine Shapes>Add Shapes.
- Zoom in and then use the Shape tool to push and pull the nodes at the bottom of this combined shape to match the shape of the bottom of the antler to the shape of the deer’s antler knob in the photo. See Figure 7.
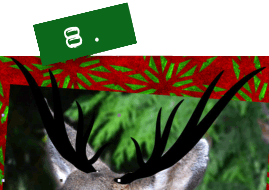 Clone the antler, mirror it horizontally, and then position it on the left a little lower than the right one. Rotate and skew this one slightly and again edit the bottom. The bottoms don’t have to be perfect just as long as they cover the knobs in the photo. See Figure 8.
 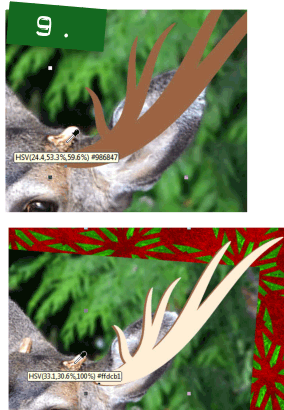 Select both antlers and move them off the knobs in the photo for the moment, just so you can see a brown area on the photo. With the antler shapes you drew both still selected, drag the Eyedropper sampler tool next to the Color Editor to sample a darkish brown from the photo. Clone the antlers and again use the eyedropper this time picking a lighter colour. Select both antlers (the light one should be directly on top of the dark one), and then put them back on the deer. The deer should look relieved and happier now, as somewhat illustrated in Figure 9.
 -
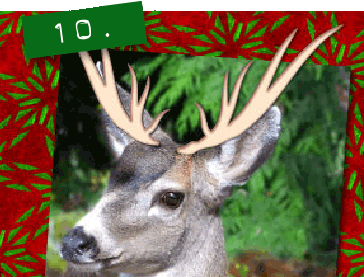 With the light brown copy selected, use the keyboard arrow keys to move (“nudge”) the light copy just one keystroke down and to the right. With the light copy still selected, drag the Feather slider on the Infobar to about 1 or 2 pixels, or until the edge of the antlers blends smoothly into the lower darker antler copy. Group each antler and use the shadow tool and give them a wall shadow. See Figure 10.
Take a break. Crack the container of egg nog in the fridge and contemplate eating the entire tin of Dansk sugar cookies you put out for company on the coffee table. Can you believe what the stores charge for that silly blue metal “Collector’s” tin this time of year!?
Decorating the Antlers
Now to add some Christmas flair (and go over the top with this project), you’re going to hang some ornaments on his new antlers!
- Start with a circle &emdash;hold Ctrl and drag using the Ellipse tool &emdash; and give it a Circular fill, using the Fill tool and the drop-down list on the Infobar. Click the outer handle on the Fill handle and then click a medium dark red on the colour line; now click the centre handle and assign it the red color swatch on the Color Line by clicking the swatch. Move your cursor around this control handle until it changes to a hand, and then pull the centre of the fill up and to the left just a bit.
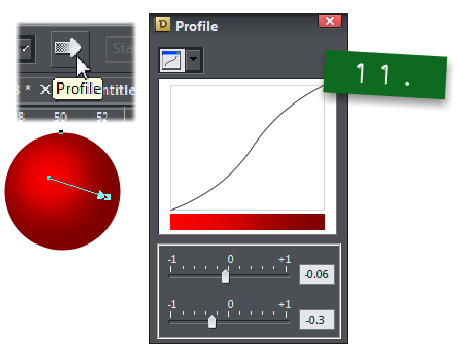
- Click the Profile (the arrow) icon on the Infobar to open the Profile dialogue. Adjust the sliders so that you have an “s” contrast and distribution amount applied to the fill, as shown in Figure 11.
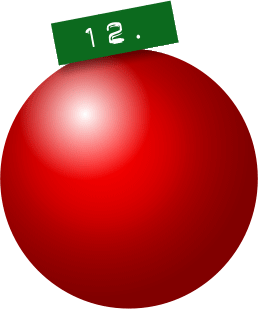 Clone the circle (press Ctrl+K) and then give the duplicate a flat white fill. Using the Transparency tool (the wineglass icon) on the Toolbar, from the drop-down on the Infobar list, select Circular to give this white circle a circular transparency. Click the outer transparency handle and pull it in, and then pull the centre of the transparency up and to the left the same way you adjusted the red fill. With this shape above the original red one, you’ve created a dramatic specular highlight on the circle, making it look quite like a Christmas ornament. See Figure 12.
 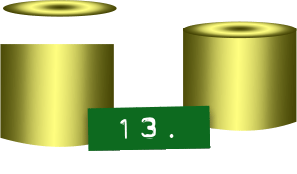 Draw a rectangle and an ellipse, using the Rectangle and Ellipse tools, respectively, in the QuickShapes group on the Toolbar.. Select the rectangle and convert it to an editable shape by pressing Ctrl+Shift+S. Use the Shape tool to pull the bottom edge down into a curve. Using the Fill tool, give the rectangle a linear fill from dark yellow to pale yellow, and then choose Repeating from the drop-down list on the Infobar. Adjust the fill by dragging on its color handles to give an illusion of roundness. Select the ellipse and give it a Repeating-style elliptical fill using the same colours. See Figure 13.
 - Put these shapes together and group. Place the top on the ornament.
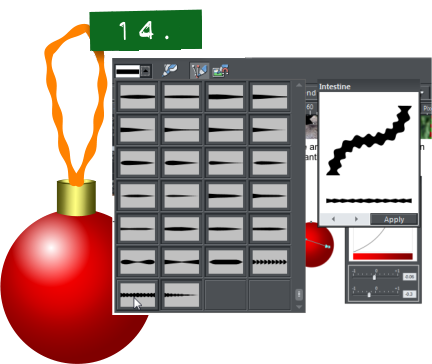
- Add a string to hang the ornament with. Draw with the Freehand/Brush tool and then use the Intestine profile shape on the Lines Gallery’s Stroke Shapes/Pressure Profiles list. By the way, to ensure that you don’t accidentally close the shape, enable Sketch mode before you draw, by clicking the middle icon on the Infobar. Orange is a good color for the string to make it stand out against the deer image background. Shift+clicking on a color line swatch colors the stroke you make. See Figure 14.
- Marquee-select all the pieces of the ornament, and then press Ctrl+G to group them. Move the ornament over to the antlers. You can scale and rotate the ornament if your artistic tastes are so inclined &emdash;the raindeer isn’t going to complain or move, you know. Also, experiment with the line width of the string to get something the images you see here.
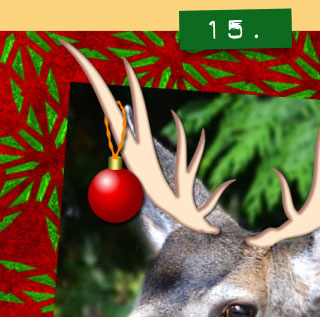 It’s easy to duplicate the ornament and change the colours and hang a few more if you like. I also added the reindeer light bulb ornament I donated to the TG Community Christmas Tree thread in the Xara Xone forum to my own finished image. It’s included in the zip archive, and in the December Tree-Trimming celebration. See Figure 15.
Fancy Corner for a Fancy Card
To create the fancy foil photo corners:
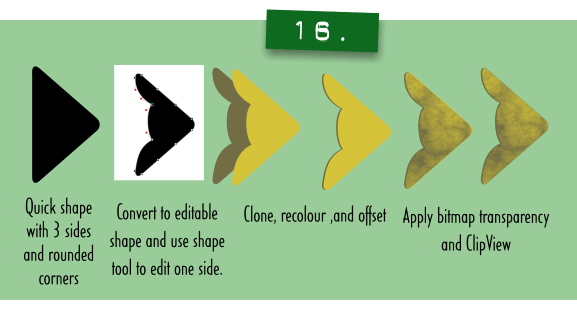
- Start with the QuickShape tool: set it, on the Infobar, to round corners and 3 sides. Hold down Ctrl, and drag to create a triangle, and rotate it so one side is at a straight vertical.
- Hold down the Shift key and stretch the triangle until the angle of the other two sides is approximately 90 degrees. Just get close as you can by eye.
- Convert the triangle to an editable shape: Choose Arrange > Convert to editable shapes, or press Shift +Ctrl+s.
- Use the Shape tool to push nodes inward and pull the side outward to create a fluted edge.
- Change the colour to a dark goldish colour, clone it, and then give the clone a lighter shade of the same colour. Offset the clone just a little bit; use the keyboard nudge keys for this.
- With the clone selected, open the Bitmap Gallery and select the noise texture, click transp to apply the bitmap as a transparency to the clone shape. You can close the Bitmap Gallery now. Select both shapes and then press Q, clipping the top shape to the bottom one. The preceding steps are illustrated in Figure 16.
Now you are ready to make this photo corner look like foil.
- With your clipped corner piece selected, choose the Live Effects tool (the plug icon), and then click New on the Infobar.
- Go down the list to Stylization, and then select emboss.
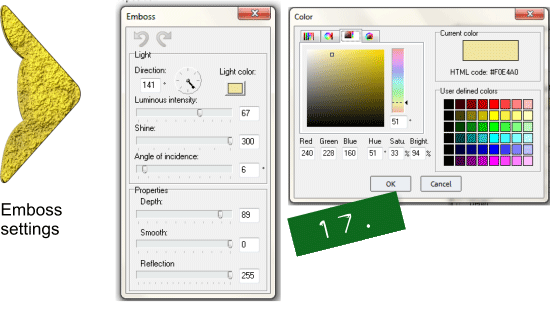
- Set the Emboss filter to approximately : Direction: 141 degrees, Luminous Intensity: 67, Shine: 100, Angle of Incidence 6, Depth: 89, Smooth: 0, and Reflection: 255.
- Click the light colour icon (this shows you the current light colour) to bring up the colour picker for the light and when it comes up it will show a red hue and be set to white. Pull the colour indicator in from the top left corner and then you will see the colours appear on the hue strip. Set the light colour to a very light golden colour such as Color (in HTML hex) F0E4A0. Experiment with the sliders and you can create various effects. To get the shiny foil look, you want a high shine and reflection, and this is the reason for the values recommended in Step 9. See all the emboss settings in Figure 17.
- Once your foil corner piece is completed, place it over a corner of the photo and use the shadow tool to give it a bit of a shadow over the photo. Drop a copy and then move it over another corner; repeat twice more to frame all the corners. Tuck the top corner piece under the antlers &emdash;use the keyboard shortcut Ctrl+Shift+B to do this. You may need to send the corner backwards more than once; be prepared to type this shortcut twice or more.
Now add your holiday message with white text and you’re done working!
Unfortunately, the raindeer has to go to work shortly. Something about moving a sleigh with some co-workers.
Merry Christmas to All!
Discuss this tutorial and show the work it inspired in the Xara Xone forum on TalkGraphics.com

(Angelize online), is the co-publisher of the weekly, Good Morning Sunshine! that has brought a smile to the faces of print and online subscribers for 14 years. She uses Xara products extensively in her work for her firm, SunWings Graphic Design. She loves to teach and share her love of Art though her YouTube channel, her contributions to The Xara Xone and her work on Xara’s TalkGraphics forum as a moderator. You can drop her a line through her website or better yet stop by the Xara Xone forum on Talkgraphics and chat with Angelize there.
The tutorial A Raindeer Christmas Greeting Card including the artwork and the downloadable examples file are Copyright © 2012 Frances Proctor. All Rights Reserved.


