


A Tips and Tricks Tutorial by Gary David Bouton (Gare online)
Making a Striking Coffee Table book Cover
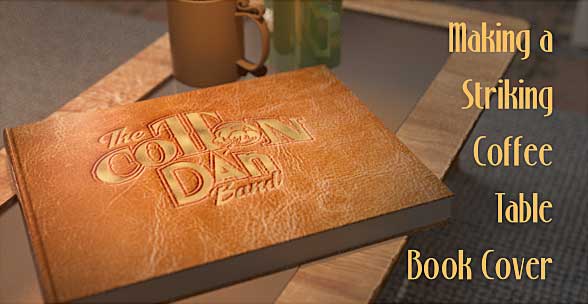
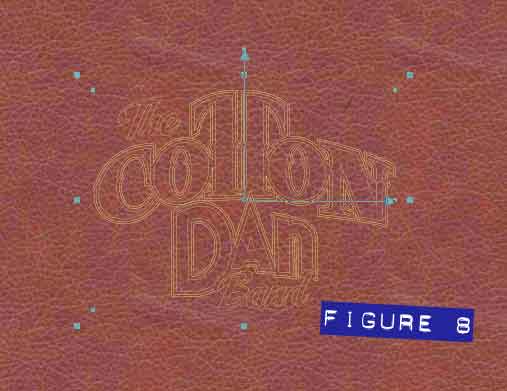
This month I’ll show you how to simulate a logo that has been embossed on a leather book cover and then and gold-leafed, as illustrated in Figure 1.
NOTE: This project began when a fellow Xarist—David Daniels—wrote to me and asked me for a “how to”. David was the founder and lead musician in The Cotton Dan Band, a popular Country band in the 1970s. David wants to create a coffee table-style book that documents the growth and timeline of his band, and the book’s cover naturally is a task that needs some of Xara’s tools. You can see and hear David’s splendid performances solo and with the group on YouTube.
Gathering Your Resources
These days it’s an easy search on the web to buy, rent, or outright own for free any number of photographic textures. In about 5 seconds, I discovered two really nice resources. You can download fairly large photographic leather samples offered by ALP Stock at I’d suggest image files of this resolution for print book covers, however I’d like to start this project off more modestly, using a smaller free texture file I found at Lynnart.net.
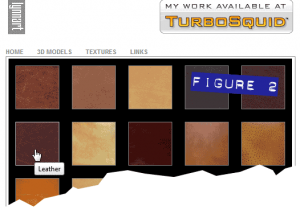
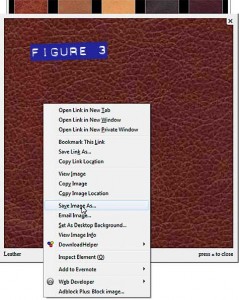
Go there in your web browser, choose the Leather collection, and then click the first thumbnail on the second row to reveal the full-size image, as shown in Figure 2. Then right-click and choose to save the JPEG file to your hard disk (See Figure 3).
It’s quite a dark image, however Xara’s Levels feature can make it suitable for this book cover, and this image seamlessly tiles—a property you’ll leverage later in this tutorial.
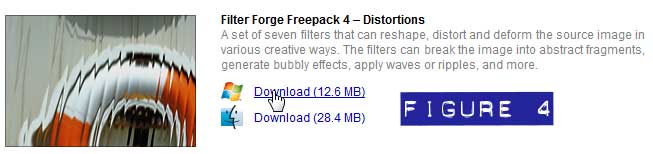
The next stop is the free download of Filter Forge Freepack 4 – Distortions. Although the nice people at Filter Forge are members of TalkGraphics and they’d love you to buy Filter Forge (the editor itself), they’re gracious enough to share with us a few presets that will operate with Xara’s Live Effects for free. Go to Filter Forge – Download Free Photoshop Plugins! page, and then click the Windows download link to download the Filter Forge Freepack 4 – Distortions, as shown in Figure 4.
Download this month’s tutorial file—click this link—which contains the Cotton Dan logo (simplified for this tutorial) in XAR file format, and you’re all set to create the book cover.
Installing a Plug-In
If you’ve never installed a plug-in so Xara can show it on the Live Effects list (and so you can use it), follow these steps while Xara is closed:
- Double-click the Filter Forge Freepack 4 Setup.exe icon from wherever you downloaded the package. If you get a security warning dialog, just click Run. It’s a safe download and you can see the signed publisher in this dialog.
- Click the Next, and the Agreement jazz, click Next until you come to the Select Destination dialog box. Paris is a nice destination this time of year, but for this filter set, you probably want to use the Browse button to go to a hard drive directory window. In this window, locate your installation of Xara, and then go down the tree to a folder called Filters, which seems like a tidy place to put the filter. Once you’ve double-clicked the Filters icon to select it, click OK, you’ll see in the Destination box that the Setup will create a unique folder (this is thoughtful and good), so click Next.
- In the Select Components box, uncheck all boxes except Plugin for Photoshop CS3, which makes the setup program install a 32-bit version of this plug-in. Xara doesn’t do 64-bit plug-ins at this time. Click Next.
- If you get nagged about other components, click Yes, you’d like to continue anyway. In the Ready to Install dialog, click Install.
- After the plug-in installs, click the Finish box, and you’re all set to get to it with this tutorial.
Creating the Stamped Leather Effect
Open Xara now, and take a look for a moment at how the Cotton Dan logo is designed. I used the Contour tool to get the outlined effect, but everything—lines and effects—have been converted to shapes. You use the Arrange>Convert Line to Shape command when you need to do this emboss effect because lines with a width property cannot accept a bitmap fill or the Bevel tool’s effect.
Let’s begin now with adjusting a bitmap copy of the 6.jpg image you downloaded from Lynnart’s website:
- Press Ctrl+Alt+I to Import the JPEG image. Choose it in the directory box and then click Open.
- You’ll note at the bottom left of the interface that the resolution of the image is a little odd; it’s 125dpi. For the sake of consistency to provide the results you’ll want in this tutorial, up on the Infobar, highlight the 399px in either the Height or Width field, type 518, and then press Enter. I did some math for you behind the scenes. The resolution of the leather bitmap is now 96 dpi, the default that Xara generates when a bitmap copy of things are made.
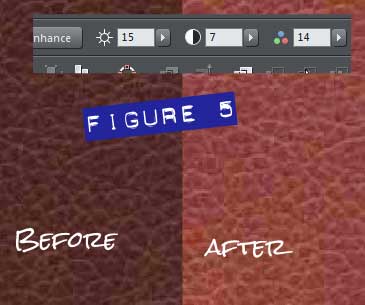 Choose the Enhance Photo tool from the bitmap editing group on the Toolbar. Doing this with the leather image selected offers Brightness, Contrast, and other image adjustments on the Infobar. Set the Brightness to about 15, the Contrast to about 7, and the Saturation to 14, as shown Figure 5.
- Press Ctrl+Shift+C, and then in the Make a Bitmap Copy box, choose TrueColor without the Alpha channel from the Color Depth drop-down. You want to make the Photo tool’s adjustments part of a new bitmap, and not simply a dynamic effect that can be changed or removed later. Making the copy makes it easier to then use the copy for other filtering and alterations. Click Create, the new bitmap lands on the page, and you delete the original file from the page now.
- Move the leather image off to the pasteboard area, and then with the Rectangle tool, drag a rectangle around the logo; make it 8 ½ by 11”, just because it’s a standard American paper size, and I’m a standard American.
- Switch to the Selector tool, and then press Ctrl+Shift+B to put the rectangle behind the logo.
- Choose the Fill Tool, and then on the Infobar, change the Fill Type from Flat Fill to Bitmap. Now, click the Bitmap Name flyout on the Infobar, and choose the copy of the leather photo stored in the document for the moment.
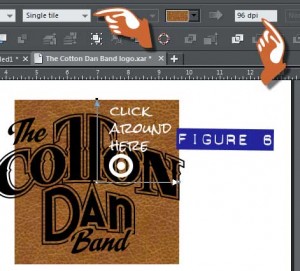 On the Infobar, choose Repeating Tile from the Fill Type drop-down list. Now, the 8 ½ by 11″ page is filled, but it’s probably not the right resolution, 96dpi. With the Fill Tool, click on an area between the two control handles for the fill (see Figure 6), but not directly on a control handle. This activates the Bitmap resolution field on the Infobar, this field tells you the current fill resolution, and lets you change it. So if the field reports something other than 96 (dpi) you can type 96 in the field, press Enter, and you’re good to proceed.
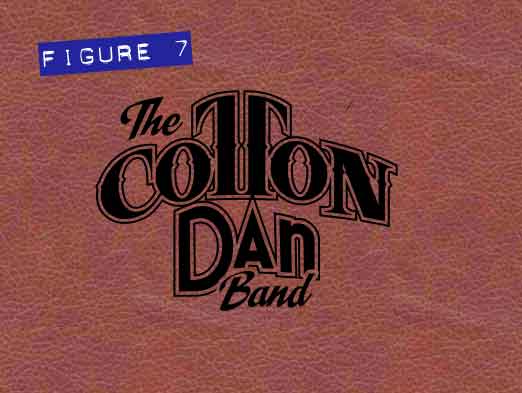
Your page should look like that in Figure 7 now.
What you’ll do next is fill, and then bevel the logo, so that it takes on a stamped look.
- With the Selector tool, choose the logo on the page, and then press Ctrl+K to clone it (copy it) directly over the original. Press Ctrl+B to put it to the back of the composition now.
- Press ESC to deselect the selected group, and then click the top group to select it.
- Choose the Fill tool, choose Bitmap from the Fill Type drop-down on the Infobar, and then choose the same leather image you used to fill the page rectangle.
- Make the resolution 96dpi, exactly as you did with the page rectangle in the previous step 8. In Figure 8, I put a hairline around the logo just so you can see it. It should be invisible on your page, or nearly so. Don’t deselect it yet.
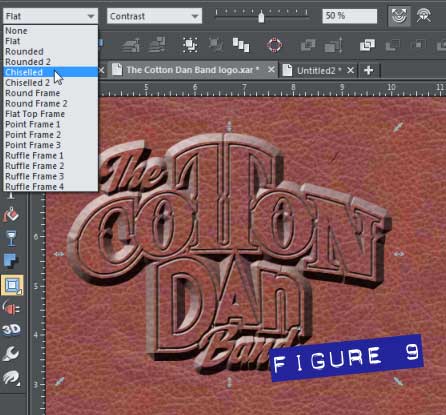
- Choose the Bevel tool (or press Ctrl+F3) from the group on the Toolbar. Drag any of the four handles outward until the size on the Infobar is about .17 inches, 4.2mm, or about 16 screen pixels, depending on how you have Xara’s Units set up in Options. Figure 9 shows a dramatic difference than the previous figure, but you’re not done yet. Choose Chiseled from the Bevel Type drop-down on the Infobar.
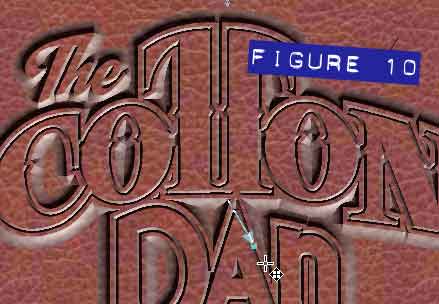
- Look carefully at the Bevel shape while the Bevel tool is active and the shape is selected. There’s a line with an arrowhead pointing outward and a dot capping the far and near end of the line. This sets the direction of the lighting on the bevel shape. Normally, when audiences see a bevel or extrude shape, we presume the light is coming from above, and that the tops of shapes are illuminated while the bottoms are dark, hidden from light. Therefore, to make this bevel shape appear to be stamped inward instead of bulging outward, you reverse the angle of the light. Click-drag the outer selection handle so the line is at about five o’clock instead of the default position of about 11 o’clock. See Figure 10.
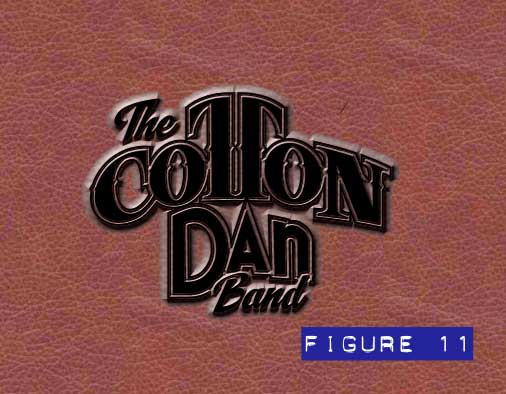
- Remember that copy of the logo? With the Selector tool, try holding Alt (to select under stuff), and clicking on the logo that’s beveled. Watch the status line and click until it says One Group on Layer 1, not one rectangle and not one Bevel. Now press Ctrl+F to bring this copy to the front. In Figure 11, the black copy is now on top, and it’s time to refocus and create some gold foil with the free Filter Forge plug-in.
Basic Alchemy: making Gold Foil from Pixels
Here’s the game plan: you’re going to create a fractal filled shape, and then make a bitmap copy of it, that will be the basis for distortion using the Filter Factor plugin. The preset I have in mind creates distortions that look like waves or smudged glass when certain options I’ll advise you about are defined. After the distorted image is saved, you’ll use this duplicate logo to clip the bitmap to its shape. And then a little tone adjustment will be used—but I’m getting ahead of myself. Here’s how to make some gold foil:
- With the Rectangle tool, drag an area that covers the logo.
- Choose the Fill tool and then choose Fractal Clouds from the Fill Type drop-down list on the Infobar.
- Note that like many fills and effects in Xara, the parent shape has control handles. The Fractal Clouds fill has options for both the light and the dark color in the fill. Click one of the outer control handles to the fractal control lines. Now open the Color Editor (Ctrl+E). Set the Color Editor to HSV Color model and then drag the hue slider to medium dark brown (try hex value 663333). Select the center control handle now, the dot at the vertex of the control lines, and then choose a color close to ffcc00 in Hex value.
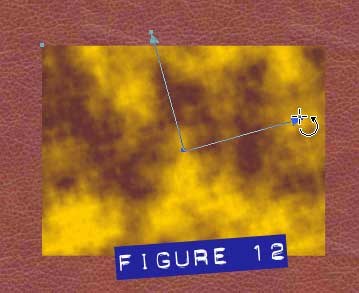 Try clicking between the handles and then set the resolution on the Infobar to 3 to make the fractal pattern less harsh. Then take one of the control handles and drag it toward or away from the center of the rectangle and then drag it up or down to rotate the pattern until it looks visually interesting to you. This will not be the final fill, as you can see in Figure 12, but instead the source layer for Filter Forge.
- Press Ctrl+Shift+C to make a bitmap copy of this rectangle. Filter Forge, and many of the other Live Effects cannot work on a dynamic fill—it has to be a normal, well-adjusted static bitmap. As before, do not choose the alpha channel Image Depth option but instead just True color, and then click Create. You can delete the original rectangle now.
- Choose the Live Effects (the electrical plug icon) from the Toolbar. On the Infobar, click the New button and then on the menu choose Filter Forge>Freepack 4: Distortions.
- In the filter box, choose the Shatter category by clicking the thumbnail. Now choose the second row, second column preset by double-clicking it.
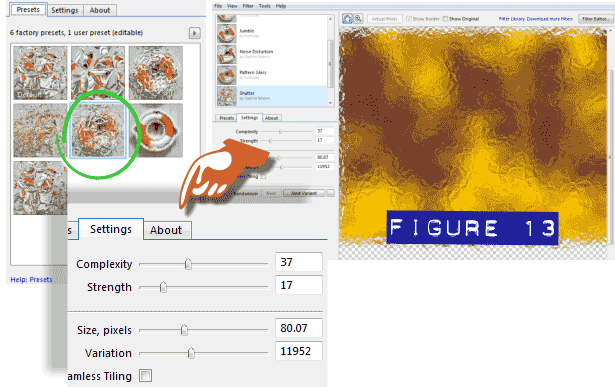
- You’re done using the Presets tab options; click the Settings tab; Set the Complexity to 37, the Strength to 17, the Size pixels to about 80, and the Variation to 11952. See Figure 13 and hold it right here for a moment.
- Don’t click Apply! This free Filter Forge plugin can save a PNG copy of your custom texture here, however it doesn’t get along very well when you insert a version of your rendered work into a page. I had problems but there’s a workaround to getting error messages and the rendered texture failing: choose File>Save Image As, and then save the custom texture to your hard disk as a PNG file. Choose PNG and a location in the directory box and then click Save.
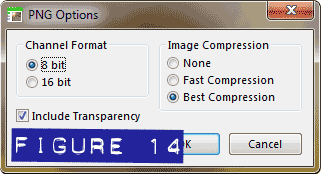 One last dialog pops up: The Save PNG Options should be set to 8 bit per channel, it’s your call about saving transparency, and it really makes not a lot of difference what type of Compression you choose (See Figure 14). Click OK, and then Cancel out of this plug-in. If you get an Unfinished ‘finish’ Event Exception box, click OK and you’re good, nothing is wrong with your project.
The values listed in this tutorial are only one of scores you can mess with to get different looks. I felt this particular preset and values looked a lot like gold foil, and how it crinkles in very small areas when you apply it.
You can import (File>Import) the bitmap now, and go get a refreshing beverage of your choice, and then return as I show you how to apply the gold foil texture to the logo in the next section.
Gilding the Logo
You’re in the home stretch now, and there aren’t a lot more steps to complete David’s logo. First, here’s how to use the Bitmap Fill feature again to “clip” the gold foil to the copy of the logo.
- Select the logo and then press Ctrl+K to clone it. Then press Ctrl+B to put it to the back of the composition.
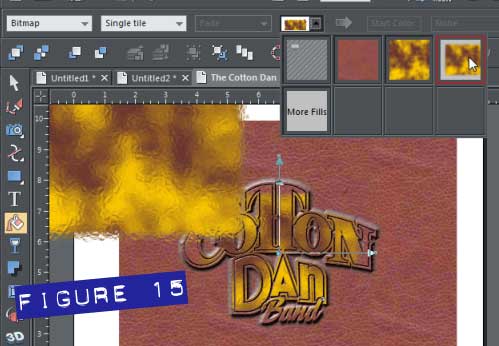
- Select the top (black) logo. Click the Fill tool, set the Fill Type to Bitmap, and then choose the distorted fractal clouds thumbnail image you imported in the previous section, as shown in figure 15.
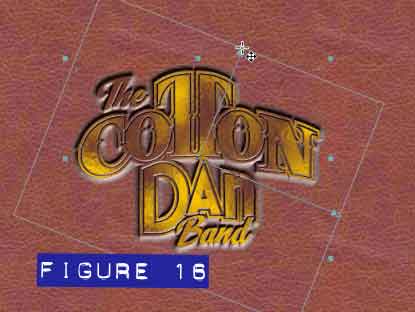
- If you need to enlarge the bitmap fill, you do so by dragging outward on either fill handle. And if you feel the gold foil fill would look better or the lettering will be easier to read of you rotate the bitmap fill, you do so by dragging up, down, left or right, sort of a circular motion with the selected fill handle. See Figure 16.
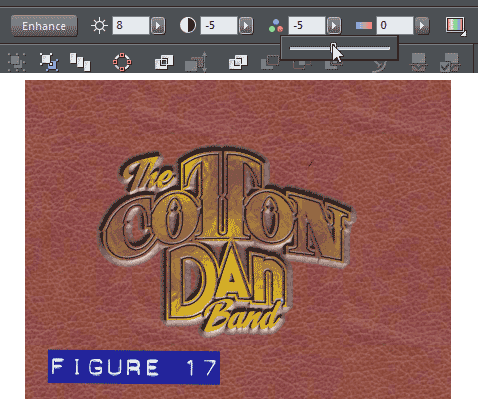
- Now that the gold foil is in place within the book cover, you can better evaluate its tone and saturation—and change them to better fit the design if you feel so inclined. I thought the gold foil would show the lettering better if it was brighter, had less contrast, and wasn’t quite so saturated in color—duller might be better. In Figure 17 you can see the difference made when you use the Photo tool on the bitmap fill, and choose +8 for a new Brightness on the Infobar, –5 for the Contrast, and –5 Saturation.
Adding A Few Finishing Touches
It’s my belief as a designer that anything worth doing well, is worth doing to excess. So (I’m kidding), there are a few enhancements that are easy to make with this composition, that will draw out more photorealistic, attention-getting qualities. First, you still have a spare copy of the logo in black at the bottom of the layer. Let’s modify this now so the gold foil lettering has a little more visual complexity:
- Choose the Selector tool and open the Page & Layer Gallery. Click the triangle to explore the contents of Layer 1, and on the bottom you’ll see a group with a tiny thumbnail that looks like the black logo. And it is. Click the Group title to select it on the Page & Layer Gallery, and then press CTRL+F to put the group to the front of the stack of shapes in this composition. This is a neat alternative to Alt-clicking to select below shapes.
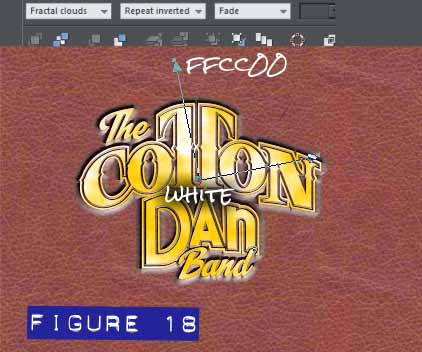
- Choose the Fill tool, choose Fractal Clouds from the Fill Type drop-down on the Infobar, and then the center control handle, the one at the vertex of the fill control lines. Make this control node white.
- Click either of the outer control handles, and then with the Color Editor, set the color to Hex: FFCC00—a pleasant medium gold color. See Figure 18.
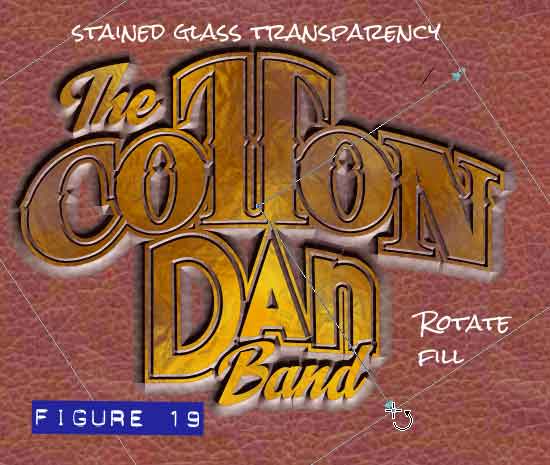
- Now Select the Transparency tool, and up on the Infobar choose Stained Glass as the Transparency Type. You’ll note a subtle change in the logo, but this touch helps push the gold foil area more into the complex and photorealistic arena.
- Go back to the Fill tool, and rotate and scale this fractal shape, until you’re happy with its contribution to the gold foil. See Figure 19.
Here’s something that goes unnoticed sometimes by Xara artists, but one simple step can create a significant difference in Bevel sides when a bitmap fill is used. You’ll notice in your work and in Figure 20 that the Chiseled sides of the Bevel logo are a little darker in some areas than you’d like, and washed out in others. Changing the Contrast on the Infobar won’t rectify the shading of the sides; this is just a fundamental limitation of the Bevel tool when bitmaps are used.
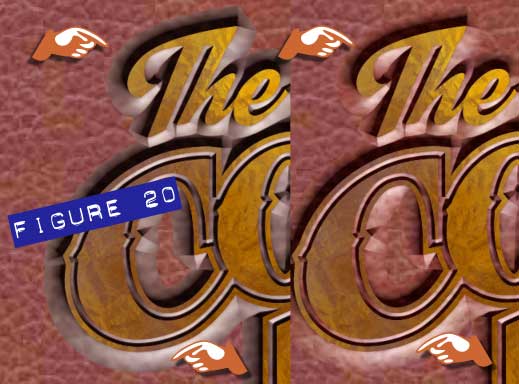
To improve the shading on these areas—almost dramatically—you destroy the dynamic property of the Bevel effect by choosing Arrange>Convert to Editable Shapes; Ctrl+Shift+S is the shortcut. What this does is convert a dynamic shape to a clipped bitmap and the Bevel edge can no longer be edited, but the bitmap result of this shape simplification is just the touch I felt was needed to make the shapes look as though the gold foil was actually stamped into the leather, as you can see a comparison in figure 20. By converting the Bevel to editable shapes, the black and white parts of the Bevel shading have mostly disappeared.
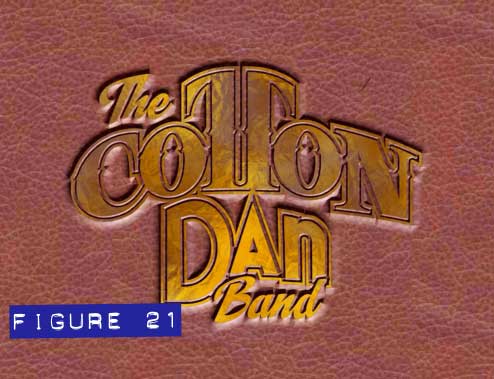
That’s it! Figure 21 is the finished piece, and now if you have a logo of your own—or that of a client—you know how to fancy the logo up to look like it’s stamped on a texture.
Experiment, we’ll discuss this on TalkGraphics, and David, thanks so much for letting me show off your coffee table book.
Discuss this tutorial and show the work it inspired in the Xara Xone forum on TalkGraphics.com

has been drawing with traditional tools for almost 40 years, and with digital tools such as Xara for close to 20. As large a fan as he is a practitioner, Gary encourages others to express themselves artistically through his writing, the over 25 books on graphics he’s had published, through the videos and tutorials he creates for The Xara Xone, and through his online school, Exclamations. You can send him some email, visit his personal website, or better yet drop on over to the Xara Xone Forum on TalkGraphics and talk to Gary and the rest of the Xara community.
The tutorial Making a Striking Coffee Table Book Cover including the artwork and the downloadable examples file are Copyright © 2013 Gary David Bouton. All Rights Reserved.


