


A Tips and Tricks Tutorial by Stephen Whittle (Stygg online)
Making Surreal Backgrounds with Xara Fractals
When you’ve worked hard on a foreground shape in a composition, and need to create a quick background to support it, the background can be elegant without upstaging the hero of your scene. Last month we had a discussion on the Xara Xone thread about using Live Effects to make reflections, and I used a number of fractal fills to create a surreal “End of the world reflected into a pool of gold” sort of background. Gary Bouton told me that my background was much more interesting than the sphere and reflection he’d created, and would I please explain how I built the background scene. See Figure 1.
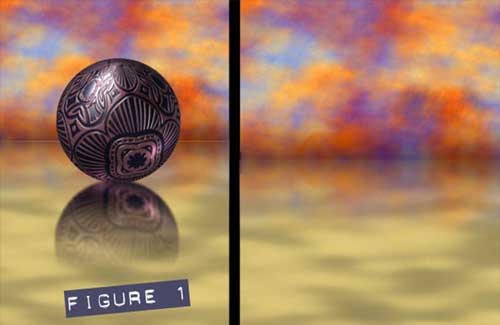
There are several elements in this image, among them the tempestuous sky, the golden waves that represent the ground plane, and some reflections of the sky into the ground plane. Let’s begin by building the sky area. You need to create three rectangles and three shapes for the sky, so let’s begin with the first rectangle.
Whipping up a Cloudy Sky
-
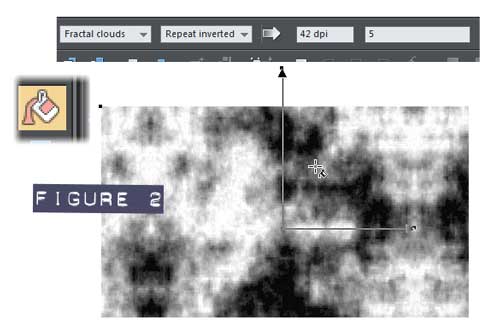
For this example, draw a rectangle 672px by 386px —roughly 2 to 1 in aspect ratio, landscape orientation — and then with the Fill tool, choose Fractal Clouds from the Infobar drop-down list. With the Fill tool, click in the rectangle but not on the control handles; doing this displays all the options for this fill type on the Infobar. Choose Repeat Inverted from the Fill tiling drop-down list to the right of the fill type drop-down. Type a dpi of 25 with fractal grain at 5. You should have a rectangle now that looks like that shown in figure 2.
-
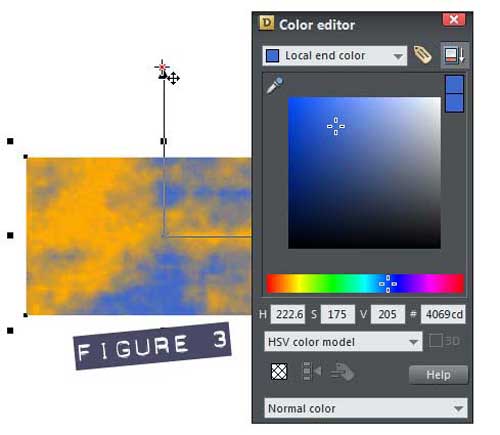
Select the centre node of the fill handle, and then click the Color Editor button on the color Line (or press Ctrl+E. In the # field toward the right of the Editor, type #ffaa00, a bright orange. Select either one of the other two outer handles and then set the colour to #4069cd, a bright, medium blue. Position the centre node in the centre of the rectangle. See Figure 3.
-
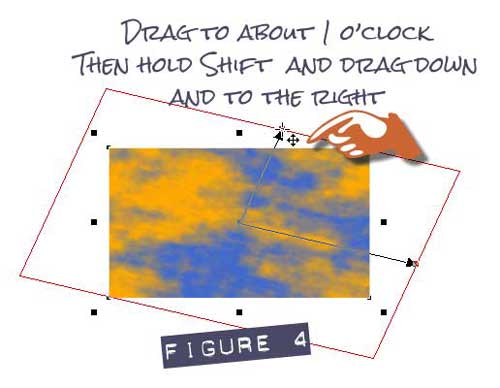
Now, to make the clouds look a little more animated, drag the top control handle for the fill to about 1 o’clock, rotating the fractal clouds just a little clockwise. Now, let’s skew the fill to suggest motion: while holding Shift, drag the top control handle just a little toward 3 o’clock. Notice the control handles are no longer in 90 degree opposition to one another. You can un-skew the fill simply by dragging an outer fill handle without holding Shift. That’s the first rectangle complete, see figure 4.
-
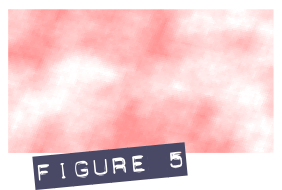 The second rectangle is should be 735px by 992px in this example. And easy way to specify these dimensions is to drag a rectangle using the Rectangle tool and then before choosing a different tool, you type the values in the W and H boxes on the Infobar, pressing Enter once the value is entered. Give this a fractal clouds fill, repeat inverted, dpi 14 and grain at 5. This rectangle will be blended into the first, so choose the Transparency tool from the toolbar now. The icon for this tool is an empty wine glass, suggesting the toolbar has had a little too much to drink. Apply a Flat mix transparency (from the Transparency Type drop-down) and a value of 59% by dragging the slider on the Infobar. Again, position the fill at the centre of the rectangle; you might also want to rotate and skew the fill a little as you did in the previous step. Select the centre node and give it a colour of #ffffff (white) and one of the outer nodes a colour of #ff0000 (red). See Figure 5.
-
The third rectangle is 831px by 155px. Give it the now familiar a Fractal Clouds fill, Repeat Inverted as the Fill Tiling, but a dpi of 19 this time and grain of 10†. Position the centre node in the middle of the rectangle and give this node a colour of #330066 (murky purple) and one of the outer nodes a colour of #336699, a deep rich blue. Give this fill a linear transparency, the top node, pointy bit, 100% the bottom node 11%. Drag the top node down to the position shown in figure 6.
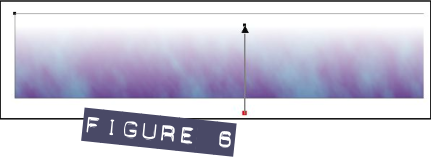
† The Grain option on the Infobar controls how smooth or coarse the fractal pattern appears. A value of 1 will produce an exceptionally subtle cloud pattern for example. The DPI setting (dots per inch, or pixels per inch if your monitor came with pixels and not dots) determines the size of the pattern. At low values the clouds will appear very large in your filled shape, and also the pixels will be visible so you might want to blur the final filled shape to hide the harsh elements of the low resolution fill.
-
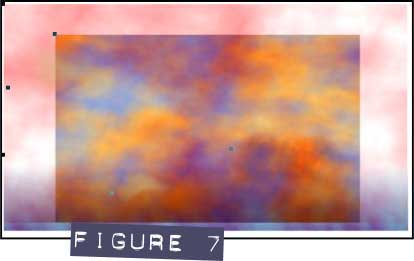 Put the red/white semi-transparent shape over the gold and blue cloud shape, and then position the murky purple shape centered at the bottom of the other two, as shown in figure 7.
-
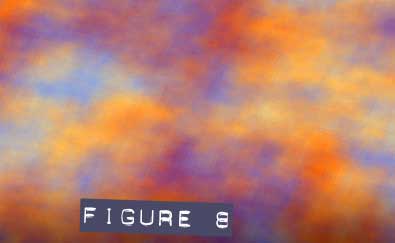 Press Ctrl+A (Select all) and then press Q to make the bottom shape a ClipView
shape and the sky is all neat and tidy now, as shown in figure 8.
Creating the Ground Plane
-
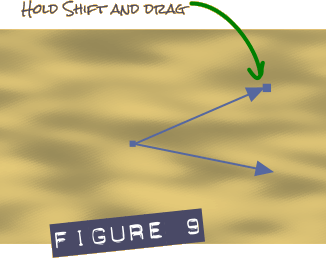 Create a rectangle 627px by 509px. With the Fill tool selected, give this rectangle a Fractal Plasma fill, 10 dpi and Grain of 30. Position the centre fill handle in the middle of the rectangle and with this node selected, give it a colour of #ebcf7b, a reddish-yellow. Select one of the outer nodes and give this a fill colour of #938657, a medium warm brown. Now the rectangle doesn’t look like a molten sea of gold. Yet. This is because to make a Fractal Plasma type fill look like a sky or an ocean, the fill needs to be skewed and disproportionately scaled. Click the top outer control handle for the fill, hold Shift, and then drag in about a 5 o’clock direction until the plasma becomes waves. See Figure 9.
-
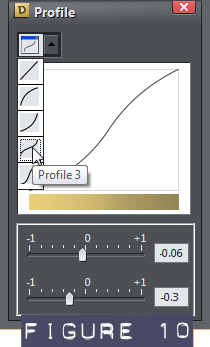 With the Fill tool, click on the image and then click on the Profile button on the Infobar, the arrow shape shown in figure 10. Select Profile 3 from the palette’s drop-down list, and apply the settings. This adds some contrast to the plasma fill.
-
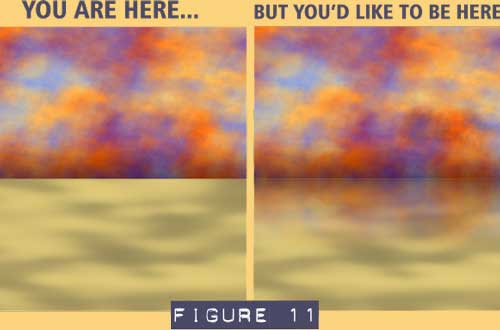
Move this ground plane up to meet the base of the sky image as shown in figure 11. Now, figure 11 at left is good, but the image at right is the completed background scene, and it has more drama, a better horizon and a few additional enhancements. Now that you’ve moved continents and made the sky come down and touch the ground plane, you’re rightfully in awe of your new skills, but let’s move on and create this reflection effect to your drawing of a surreal background.
Let’s do a Little Reflecting
In order to quickly create a dramatic horizon that dims and mirrors the sky area, you simply create a copy of the ClipView shapes, flip it and scale it disproportionately and add a little linear transparency. Here are the steps:
- Select the top sky area using the selector tool. The status line should tell you that a ClipView shape has been selected.
- Clone this ClipView. Pressing Ctrl+K does the trick.
-
With this copy selected, click on the Set Origin position as shown (looks like a dial pad) on the Infobar. Doing this sets the origin when you perform the flipping operation on the shape. See Figure 12.
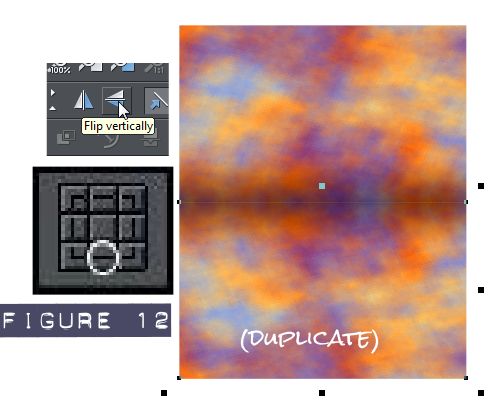
- Click on the Flip vertically, this will give you an exact upside down image of the sky. We now need to give this image a transparency of the Linear type, so this copy will gently and seamlessly blend into the gold ground plane.
- With the cloned image selected, choose the Transparency tool on the Toolbar.
- Drag the tool to the bottom of the ground plane shape and the other to the top of the ground plane shape. This dragging action with the Transparency tool automatically sets the type of transparency to Linear.
- With the bottom node selected, set the Transparency slider o the Infobar to 100% then select the top node and set this to 0%.
-
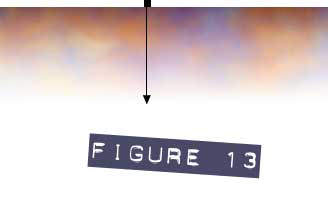 Finally, select the bottom node and drag it up to about halfway of the ground plane image.
Your cloned image should look like figure 13. now, except that your clone shape should be over the molten gold fractal plasma rectangle now.
Finally, select the bottom node and drag it up to about halfway of the ground plane image.
Your cloned image should look like figure 13. now, except that your clone shape should be over the molten gold fractal plasma rectangle now.
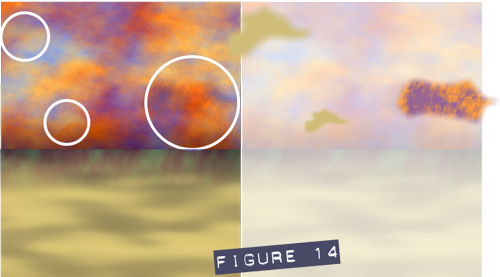
You could call it a day with this composition —after all, it’s sort of looking like dusk in your drawing —but if you’d like to enhance the sky just a little bit more, you’ll find the payoff to be not only a more powerful image, but also you’ll be getting a little more experience in with Xara’s fractal fills. I’ve ringed off three shapes at left in figure 14 that might be hard to see; at right I’ve faded out the main image to show only the three shapes with their transparency removed to ease their visibility.
These shapes consist of exactly the fills and transparency as in this Tips and Tricks tut. And in your own work you can give them any colour. To draw shapes such as these, use the Freehand and Brush tool and make irregular curved closed shapes; you might want to try tracing over some of the more interesting fractal Clouds areas in the top ClipView. Once you have your shape and fill, drag the Feather slider on the Infobar so that the shapes fade into the sky at their edges and become part of a seamless composition.
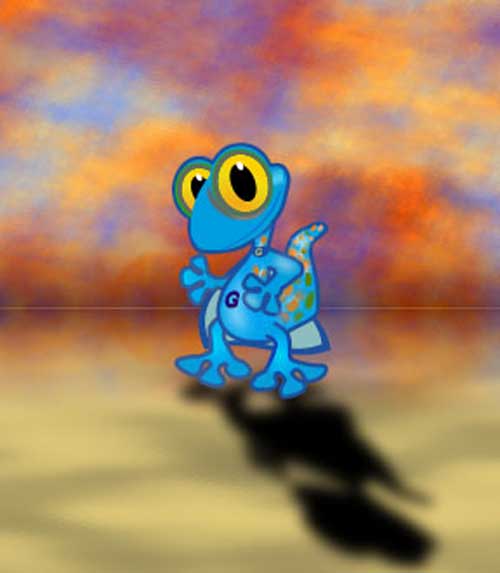
Oh, and you might want to start building a foreground illustration for this handsome background.
And if you do, by chance, look out your window and see a sky, and molten gold with a lizard on top, you might want to check the expiration date on the juice in the refrigerator.
Discuss this tutorial and show the work it inspired in the Xara Xone forum on TalkGraphics.com

(Stygg online) says"I joined Talkgraphics in 2006, knew nothing about graphics whatsoever but I loved the images I was seeing on Talkgraphics.com. and thought I'd give it a try!! Retired now, but was an Electrical Engineer, educated at De La Salle college, took my degree at University of Salford, can I have the job now!!" Be sure to stop by the Xara Xone forum on Talkgraphics and chat with Stygg there.
The tutorial Making a Surreal Sky and Base in Xara including the artwork and the downloadable examples file are Copyright © 2013 Stephen Whittle. All Rights Reserved.


