


A Tips and Tricks Tutorial by Gary David Bouton (Gare online)
Adding Custom Textures to Your Web Pages
In Xara Web Designer 9 and Xara Web Designer 9 Premium, (download a trial copy here) adding content is usually done through the Designs Gallery, where Flash animation examples, Clipart, and other materials is basically a drag and drop process. However, if you want to add your own designs (such as the Backgrounds in this month’s Giveaway), you need to do this through the Bitmap Gallery. Follow these steps and you’ll be good to go with custom Page and Pasteboard background images for Xara Web Designer 9.
Customizing the Pasteboard Area
The Pasteboard Background Layer area in Web Designer is the area outside of the printable page. There’s really no agreed-upon equivalent name for this area in your web browser, but whatever you care to call it, it lies outside of the printable page, outside of the content of your webpage. In Web Designer, you can elect to assign it a solid fill, a gradient, or a repeating, tiling bitmap image. The patterns that ship with Web Designer are accessed through the Designs Gallery, in the “Website Backgrounds” folder. However, when you want to fill this area with your own bitmap, you use the Bitmap Gallery, as follows:
- Go download this month’s Giveaway, unpack it, and put the bitmaps in a folder that’s easy to remember. Actually, in the root of the Web Designer install is a folder named “Bitmaps”, which is as good as any to load up with seamless tiling bitmaps.
- Create your website, or load one of the templates that ships with Web Designer. See Figure 1.

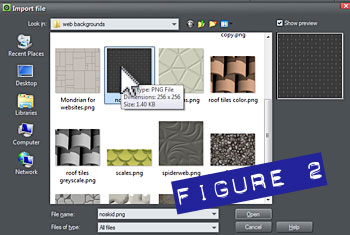 Press Ctrl+Alt+I—the shortcut for File, Import—and then choose one of the tiling textures from this month. Select it, click Open in the Import File dialog box, (see Figure 2.)
- If queried whether to convert to JPEG or Do not Convert, for this tutorial leave the import as its original PNG file format. After answering this dialog box, the imported bitmap will appear in the center of your screen. You can select it with the Selector tool, and delete it. A copy resides in the Bitmap Gallery.
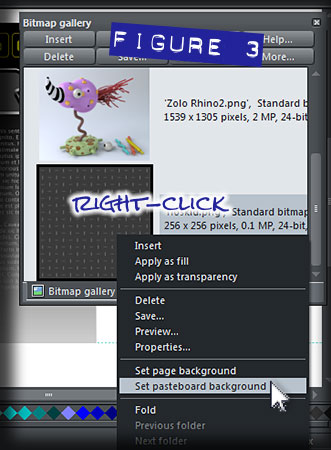 To apply the bitmap–at its original size–right-click over its thumbnail in the Bitmap Gallery, as shown in Figure 3.
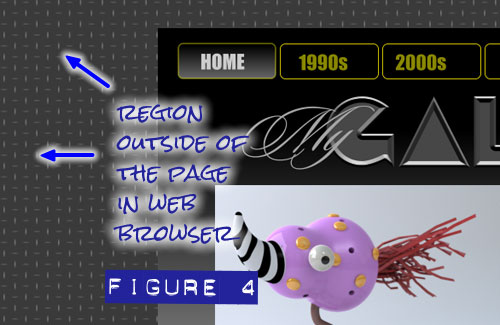
- Then choose “Set Pasteboard background” from the context menu. Figure 4 is a detail view of the result of this command.
Customizing a custom texture
All the Giveaway seamless textures are 196 pixels per inch in resolution (also called “dpi”) so Retina displays on mobile devices will show crisp, crystal-clear image backgrounds. Upon exporting your site, Web Designer down-samples the images to 50% resolution (96dpi), but sometimes you might want to scale the background textures so their patterns appear smaller.
Giveaway textures such as hex tiles.png and Charcoal II.png admittedly are a little large to be a subordinate design element on your pages. The solution is to scale a copy of these textures using a special document in Web Designer called Blank Photo. Additionally, as long as you’re making a copy of the original, here’s your chance to also use the Photo tool’s features to adjust the brightness, the color cast, and so on, to meet your needs and tastes.
- Choose File>New>Blank Photo.
- Open the Bitmap Gallery, and then open the folder that belongs to the webpage document you’re working on. You’ll see a list of bitmaps in that document displayed as thumbnails.
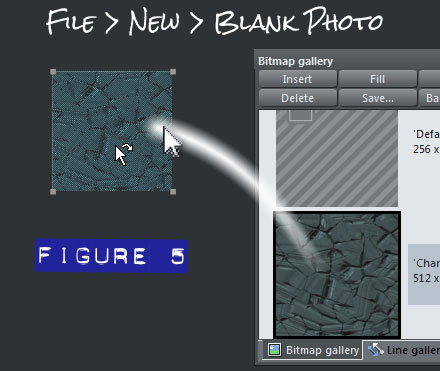 Drag the thumbnail you want to resize into the Blank Photo document, as illustrated in Figure 5.
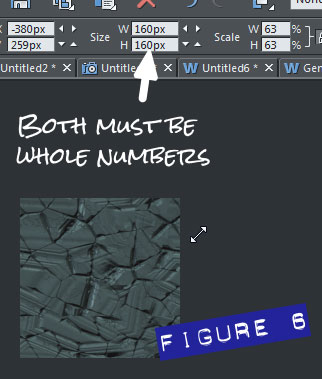 Here’s the deal-maker or deal-breaker: with the Selector tool, click-drag a corner control handle toward the center of the selected bitmap. As you’re doing this and arriving at the ideal new size for the bitmap, look at the Size Width and Height values. They MUST be whole integers. Xara products offer such a level of accuracy that you can scale shapes to fractional values, but with bitmaps you must not arrive at, for example, 215.3 pixels in height or width. When a bitmap is scaled to a fractional width or height value, the resulting copy is anti-aliased around the outside edges—Xara has always done this to keep image areas smooth—but it also ruins the seamlessness of tiling bitmaps. If your background image is non-square, it’s going to be inevitable that the height or width will not be a whole number. The solution in this case is to unlock the percentage fields on the Infobar, type whole number values in an H or W field that has an unwanted fractional amount, and then press Enter to register the new whole value. See Figure 6.
- Press Ctrl+Shift+E to Export the selected edited bitmap. The PNG file format usually produces an image that’s larger than a JPEG of the same image, but the file format is up to you, and you can always change a PNG to JPEG when you re-import the background tiling image to the webpage you’re working on.
- Go back to your webpage document, import the bitmap you edited in steps 4 and 5, and then apply it as a Pasteboard Layer Background exactly as you did in the second step at the beginning of this tutorial.
Optionally, you can also set the interior of an HTML page to a seamless tile. You click to select the thumbnail in the Bitmap Gallery, and then from the right-click shortcut menu, you choose Set Page Background.
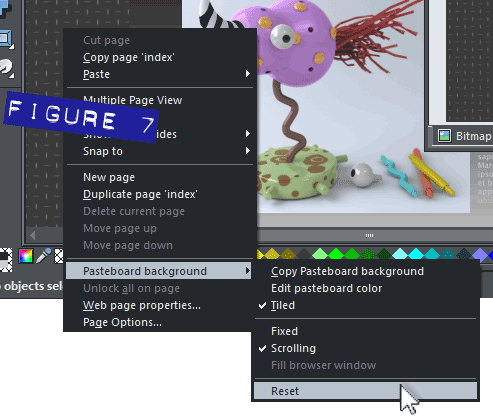
It’s also worth mentioning as I close here that you can remove a Pasteboard and Page bitmap background as easily as you’ve defined one. For the Pasteboard Layer Background, all you need to do is right-click over the Pasteboard area, and then choose Pasteboard Background>Reset, as shown in Figure 7.
Have fun with your new textures and don’t forget that any of these can also be used as shape fills in Web Designer or Xara Designer, just about any version from the past 15 years.
Discuss this tutorial and show the work it inspired in the Xara Xone forum on TalkGraphics.com

has been drawing with traditional tools for almost 40 years, and with digital tools such as Xara for close to 20. As large a fan as he is a practitioner, Gary encourages others to express themselves artistically through his writing, the over 25 books on graphics he’s had published, through the videos and tutorials he creates for The Xara Xone, and through his online school, Exclamations. You can send him some email, visit his personal website, or better yet drop on over to the Xara Xone Forum on TalkGraphics and talk to Gary and the rest of the Xara community.
The tutorial Adding Custom Textures to Your Web Pages including the artwork and the downloadable examples file are Copyright © 2013 Gary David Bouton. All Rights Reserved.


