


A Tips and Tricks Tutorial By Gary David Bouton(“gare” on online)
Edgework: Another Step to 3D Drawing
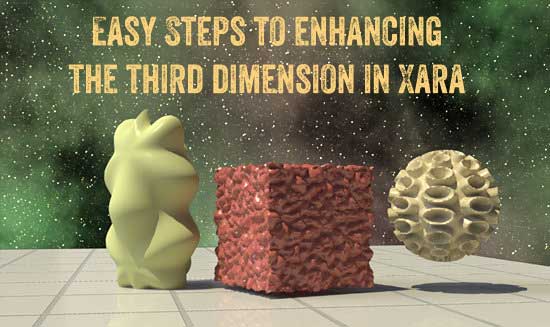
There’s something irresistible to Xara artists about emulating the dimensional qualities of a photograph; for the sake of brevity in this tutorial, let’s just call it the 3D look. What goes into this look can be found in traditional drawings and paintings: perspective, shading, lens length (fisheye, long lens and so on), symmetry, and other qualities that convince the audience that they could hold or step into the work.
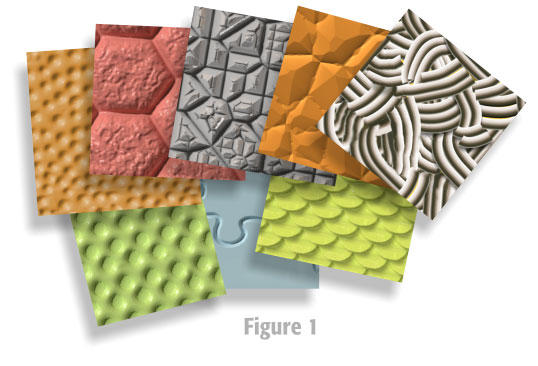
However, there’s one much overlooked quality in 3D drawings that everyone who works with 3D programs is aware of: displacement mapping. Displacement mapping is something Xara does not do because it’s a drawing and not a modeling program, but there’s no reason why you can’t achieve a true 3D look by manually adding and subtracting from a basic shape that’s been filled with a 3D-ish texture. In Figure 1, you can see several dimensional seamless tiling patterns that are included in the tutorial download zip file this month. You can most likely find several of your own by checking out free textures on the web, but first you’ll need to work through the tutorial to know exactly what type of texture lends itself to a 3D fill for shapes.
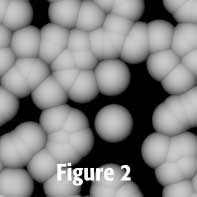
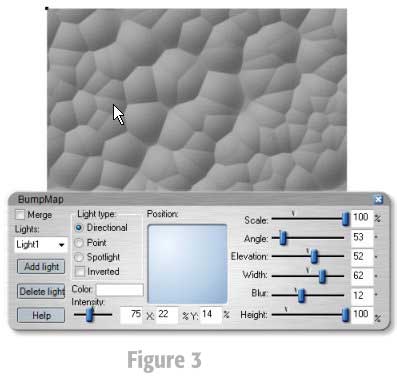
One way to create your own textures is included in Xara. It’s a Live Effect called 3D Bump Map toward the top of the Live Effects menu. Look at Figure 2 for a moment. This pattern was created in a free texture maker, Gentex, toward the middle of the page[/url], but it could have been drawn with a little effort and feathering directly within Xara. Let’s see what Xara’s 3D Bump Map comes up with, using Figure 2’s texture as the target. As you can see in Figure 3, with a little twiddling of the controls, you can wind up with a pretty dimensional texture, and after applying the filter, you can recolor the grayscale result.
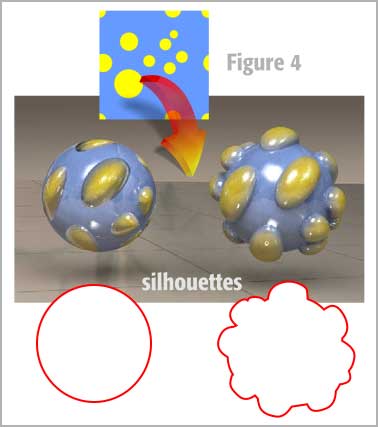
Now, if you filled a circle with this 3D texture, would you wind up with a 3D shape that has lots of pimples or whatever? No. Take a look at Figure 4, because shows a property of 3D objects that bump mapping cannot create. The circle at left still looks like a circle, even though it has dimensional spots across its surface. The problem is that with bump mapping, you have not actually created areas across the shape that extend beyond the profile of a circle. Bump mapping creates the illusion of areas extending and recessing from a surface by adding light colors to light areas, and shading the darker areas with shading falloff. Bump mapping is good, but displacement mapping achieves a true 3D look because it actually pushes light areas away from the surface—including those partially obscured by the profile of the circle, to photorealistically depict a 3D sphere with exaggerated bumps.
So, to make textured shapes look like objects in 3D space, and not shapes filled with a texture, you need a strategy, and that’s the whole point of the steps to come.
An Example of making a Circle into a Ball of Twine
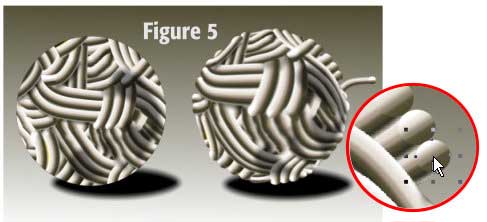
Figure 5 shows a circle filled with the Tiling Yarn.png file. Try as I might, by adding a drop shadow and some shading to the circle clipping the png file, the left illustration doesn’t go beyond a fancy circle. At right, (hopefully!) you can see the difference between a circle and a ball of twine. When a ball is wound out of twine, you’ll see small protrusions along the profile of the circular shape. What I did was create circles and the Eyedropper along with a multi-color linear fill to fairly closely match the falloff of the twine strands in the texture. I also cut out areas where the twine wasn’t wrapping around the ball. Finally, I applied the Deformation>Fisheye Perspective Live Effect. Always apply any Live Effect as the last editing step in making a more photorealistic shape into an object; quadrangles, as you’ll soon learn, will change shape as a Live Effected shape is trimmed. Consider putting a filled texture shape within a shape by using ClipView, and then change the ClipView object instead of the Live Effect shape.
You can see how I created the ball of twine by opening the Yarn Ball Finished.xar file in the Zip archive you downloaded.
Getting to Work: Making a Stone Cube
All talk and no play makes for a dull boy or girl. Open the Cube Template and why not choose the top left cube as your template in the steps to follow?
Importing and Snapping a Moulded Texture to a Template
Sorry: that is the weirdest heading above I’ve ever written!
-
Check the Page & Layer Gallery for a moment and make sure it’s the way I set it—you’re working on the Background layer with the Guides layer on top of it, visible but locked.
-
From the unpacked Zip archive, import
(Ctrl+Alt+I)and then choose Rocky.png. When asked if you want the imported bitmap converted to JPEG, click Do Not Convert—there’s no reason to degrade this texture. -
With the texture selected, choose the Fill tool, and then on the Infobar, choose Repeating Tile from the Fill Tiling drop-down box. Then press
Ctrl+Shift+Sto convert the imported bitmap to an editable object. Doing this lets you take this tiny repeating tile and increase its size by dragging the corner control points. -
Select the texture image and then right-drag then release to drop a copy of the texture. Do this again; this cube has three sides, so you need three textures.
-
With one of the textures selected, choose the Photo tool from the Toolbar to get the Brightness Levels dialog to appear.
-
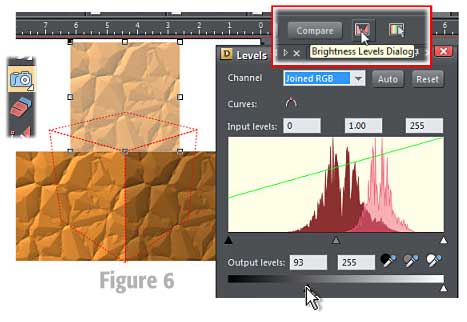
There’s an Output section at the bottom of the dialog box, with a Black Point slider at far left (a little hard to see), and a White Point slider at far right. Let’s make this selected texture lighter for the top of the cube. Drag the Black point slider to the left until you reach
93on the left Output level, more or less. -
Now, select another texture and you’ll make it darker, thus creating three different tones, which in turn will suggest global lighting on the cube you’re designing. See Figure 6 where the top texture is being lightened. At any time now, arrange the three textures as shown in this figure.
-
With the left texture selected, choose the Mould tool; you should find it on the Toolbar flyout that by default has the Bevel tool showing (in version 10). Or press
Shift+F6, which you will never remember. -
Choose the Default Perspective button on the Infobar.
-
Drag a corner of the selected texture to the corresponding corner of the template guide. Continue doing this until the selected texture aligns to the template guides.
-
Do the same as steps 8 and 9 with the right texture.
-
There’s really no good way to align the top texture because the guide and the view of the cube are at an angle. Therefore, just drag the top right corner control point to the top guide corner; drag the bottom right corner to the far right template corner, and it’s a snap (literally) to get the other two corners where they should be. See Figure 7. Take a break for a moment; pressing
Ctrl+Sis a good idea to do while taking a break.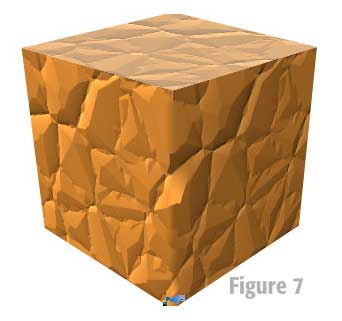
Edgework: Hiding Tones across the rock
Although this might be an impressive drawing, it needs displacement work, in this case hiding the hard edge between the tones of rock fragments where the textures meet at their edges. Here’s techniques number 1 for making a more photorealistic cube made out of stone:
-
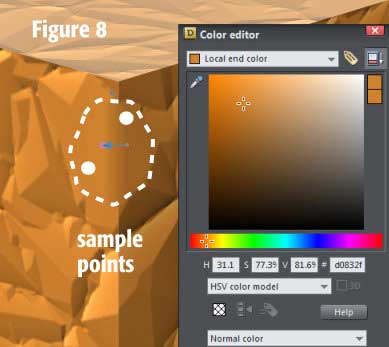
Zoom into the area toward the top of where the left and right faces meet. It’s okay to peek ahead to Figure 8.
-
Create a shape using your favorite drawing tool that covers the hard edge and actually extends outward a little, as shown inFigure 8
-
Go get the Color Editor
(Ctrl+E)and us the dropdown button to extend the palette and set the color model to HSV. -
Choose the Fill tool and then drag left to right with the shape selected.
-
Click the beginning control point of the linear fill and then with the Color Editor’s eyedropper, sample an area close to the left edge of the texture.
-
Click the end control point of the fill, and then sample a color on the texture that’s close to the right edge of the shape.
-
Play a little with the linear fill’s control handles until the shape blends the edge underneath and hides it, you might want to use the Feather slider just a little, perhaps
.25 pt. -
Continue working downward using steps 5-7 wherever a hard line is visible at the edge of the left and right texture.
-
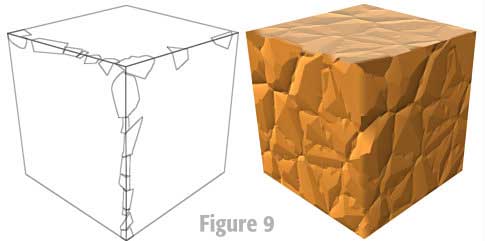
This is the end of Technique number 1. Continue using it along the top left and then the top right edge of the cube. Here’s wireframe view of approximately where the “cover-up” shapes should be located in Figure 9.
Moving from Inside to Outside of the Cube
If you use your imagination and artistic eye to crop into the cube and ignore the straight edge profile, you’ll notice that the areas you blended together appear to extend outward toward the viewer. This is because you made some of the rock fragment whole by blending the edge out, and this provides the audience with a visual cue that they’re looking at a single, whole rock fragment, perfectly lit.
Now you need to roughen up the six outside straight lines that make up the cube. This is not hard, but it is a little time consuming. If you can’t invest the time to complete this tutorial right now, save and come back.
Let’s begin with the right outside edge of the cube, but first you want to make a copy of your work, and work on a bitmap copy of the cube. Why? Because you’ll be actually removing sections of the texture, the texture is in a Perspective Mould, and weird, unwanted stuff happens when you try to edit a shape within a Mould.
-
Select all
(Ctrl+A), and then make a bitmap copy(Ctrl+Shift+C). In the Color Depth box, choose True color+Alpha from the drop-down list. Click Create and then move the original pieces (group them first,Ctrl+G) to the side so you can work on the bitmap copy now. -
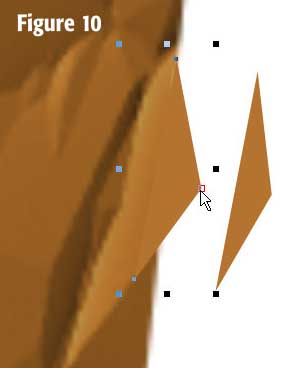
Zoom into the far right edge of the cube, and then find an area, as shown in Figure 10, that can be extended and look correct. Because this cube is lit from the left, darker areas on the edge should probably recess, while lighter areas (shown here) can extend. Create an angular shape to extend the lighter area, and then use the Color Editor to match the new shape with the color next to it, the color to be extended.
-
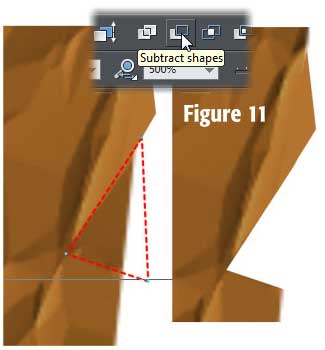
When you work your way up the right side, you’ll find darker areas, which should have a recess relative to the original straight edge. With your favorite drawing tool, create an angular shape over the part of the edge to be removed. Then choose Arrange>Combine Shapes>Subtract Shapes, as shown in Figure 11, except I clicked Subtract Shapes as a button on a toolbar.
-
The excitement is almost over; you almost have a dimensional cube made out of stone. Here are some guides as you work your way counter-clockwise (anti-clockwise for Rik) adding and subtracting from the cube: first, don’t overdo it. Don’t subtract or add too deeply or extend ridiculously. Pretend this is a fine piece of sculpture and every “chisel” you perform should be somewhere between subtle and obvious. Create only about 3 to 5 edits on each face of the cube. And finally, once in a while forget what I said earlier about dark should always recede and light ya-dah-dah. You’re an artist, you decide what looks right to you.
-
Press
Ctrl+S. Your work is almost over. See the comparison between when you began and the present version in Figure 12.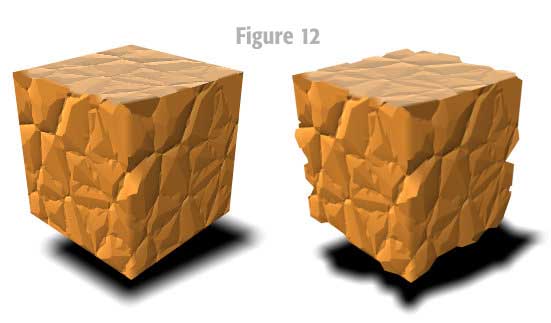
Get out your Highlighter
In theory, this piece is done and you’ve created a dimensional piece after following my somewhat tedious instructions. But wait: because the top face of this cube was lightened, it looks a little flat because the contrast has been lessened as it was brightened. Here’s the solution and the conclusion:
-
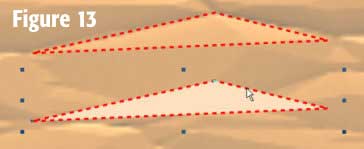
Examine the top of the cube for a light area. Trace around it and then move it to the side.
-
With the Color Editor, use the eyedropper to sample the color of the area you traced around.
-
Lighten the color, perhaps significantly. See Figure 13.
-
With darker colors, perform steps 1-3, except make the final color darker.
-
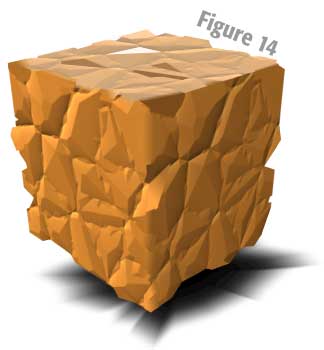
You only need 5 pieces tops, to alter the surface of the cube. Here’s a hint: don’t make all the dark and light colors the same tone. Alter them to suggest irregular crevices and outward-pointed areas. Figure 14 shows the finished cube. I tried out a Blend instead of a feathered black for a drop shadow and it almost works. Try to outdo me: it won’t be hard.
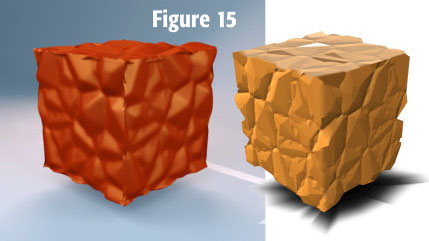
Just for the heck of it, I tried modeling and lighting the unaltered bump map, and displacing it on a cube in MODO, a product from The Foundry. As you might note in Figure 15, there is not a significant difference between learning modeling, and drawing stuff in Xara—except you’ve already learned something new in Xara and modeling can be a pain in the neck, or lower.
Discuss or ask questions about this tutorial in the Xara Xone forum on TalkGraphics.com.

has been drawing with traditional tools for almost 40 years, and with digital tools such as Xara for close to 20. As large a fan as he is a practitioner, Gary encourages others to express themselves artistically through his writing, the over 25 books on graphics he’s had published, through the videos and tutorials he creates for The Xara Xone, and through his online school, Exclamations. You can send him some email, visit his personal website, or better yet drop on over to the Xara Xone Forum on TalkGraphics and talk to Gary and the rest of the Xara community.
The tutorial Edgework: another step to 3D Drawing including the artwork and the downloadable examples file are Copyright © 2015 Gary David Bouton. All Rights Reserved.


