Toning a displaced image
Go to wireframe view of the composition so you can see the true edges of the bitmap. Then drag guides to the edges. You’re going to place a copy of the displacement JPEG file on top of the displaced flag, and then get into some creative, resourceful, manual image shading.
- Press Ctrl+Alt+I (because File>Import takes too long) and then scout down the Xarxonian-flag-disp.jpg file and click to import it to the page.

- Align it to your guidelines, as shown in Figure 5, and then give it Stained Glass transparency at about 40% (Transparency)

- Use the Brightness Levels again on the top selected displacement image. An Input Black point of 0, Midpoint of 0.88, and a reduced White Point of 146 should get you where you want to take the darker shading. Pretty amazing, isn’t it, how the darker regions suggest a light source on an object that has thickness? See Figure 6.
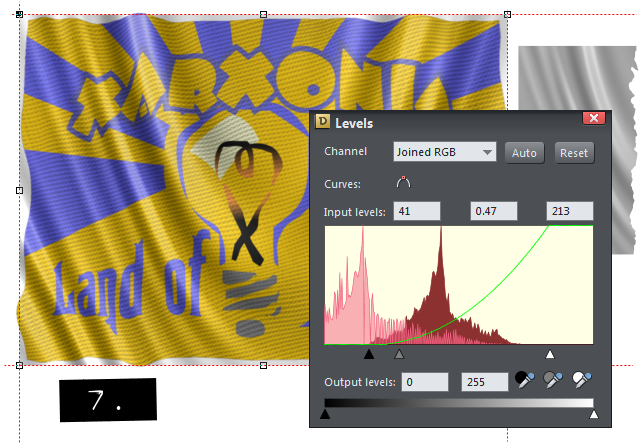
- Now for some highlights. Select the top partially transparent displacement map and then press Ctrl+K to put a copy (a Kopy?) directly on top of the stack of shapes. Choose the Transparency tool with this copy selected and then change the Transparency type on the Infobar) to Bleach. While you’re there, increase the transparency to about 50 to 60%. Get out the Brightness Levels tool now.
- Set the Black point input=41, Midpoint=0.47, and White Point=213 worked for me here, and it probably will for you, too. See Figure 7; instant highlights from the same grayscale image.
- Select all three object after you’re convinced the composite is looking as good as can be, and then press Ctrl+Shift+C. Again, use TrueColor color depth to make a bitmap copy of your work.
- You can discard the stack of shapes now and focus on the new copy. Choose the Photo tool on the toolbox.
- On the Infobar, drag the Saturation slider to the right to anywhere between 3 and 5. You’ll see the colors really pop with this nearly finished piece of flag art.

- With the Shape tool, you can marquee-select two neighboring control points at a time, and then keyboard arrow/nudge the handles toward the center of the image until the excess 10%—the rough edges—are hidden. See Figure 8