


Adding Texture to the Vector Flag
Follow these steps to make the vector flag you downloaded (or a vector shape of your own) look a little more visually intricate by adding a slight texture to it:
- You need a flag image. If you don’t have one, load Official Xarxonian flag, a country-neutral example that all can identify with.
 The Image Skill Displacement filter is going to cause some image shrinkage, particularly with woolen flags. Seriously: the filter was designed for image programs that display bitmaps in a document window. Because Xara doesn’t show bitmaps this way, the filter will fail to wrap the image around (the lack of) a document window. Therefore, when designing a shape or group of shapes you want to displace, leave about 10% safety around the principal elements of your design, as shown in Figure 1.
- Any flag design will look a little more photorealistic if it has texture, specifically a visible weave, suggesting cloth. I created Fabric Bumps.jpg with Genetica, a texture creation program. Because this image seamless tiles, it’s easy to put it over the entire flag. Import it first.
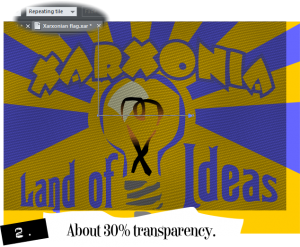
- Move the image so it aligns with the top left of the flag, then choose the Transparency tool and give the image about 30% Transparency in Stained Glass mode. You’ll use the Levels dialog shortly to bring out more detail.
- Choose the Fill tool while the image is selected. On the Infobar, choose Repeating Tile from the Fill Tiling drop-down list.
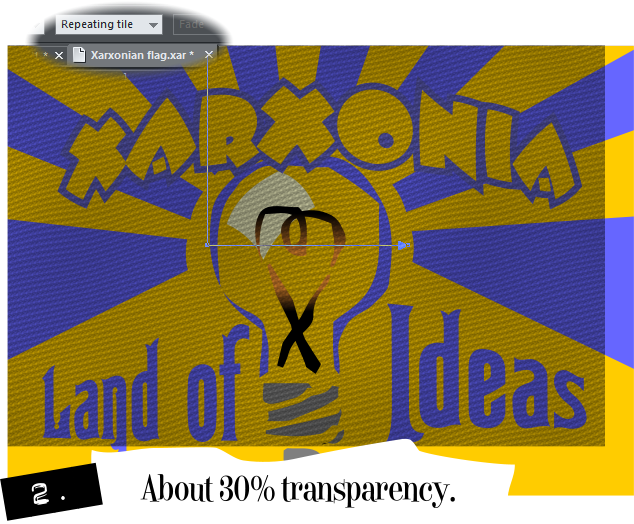
 With the Shape tool, you can marquee select two side handles of the fill and then use the keyboard arrow keys to nudge the shape’s borders until it fits the entire flag, or you can click-drag single control points to do the same task, just a little more slowly. See Figure 2.
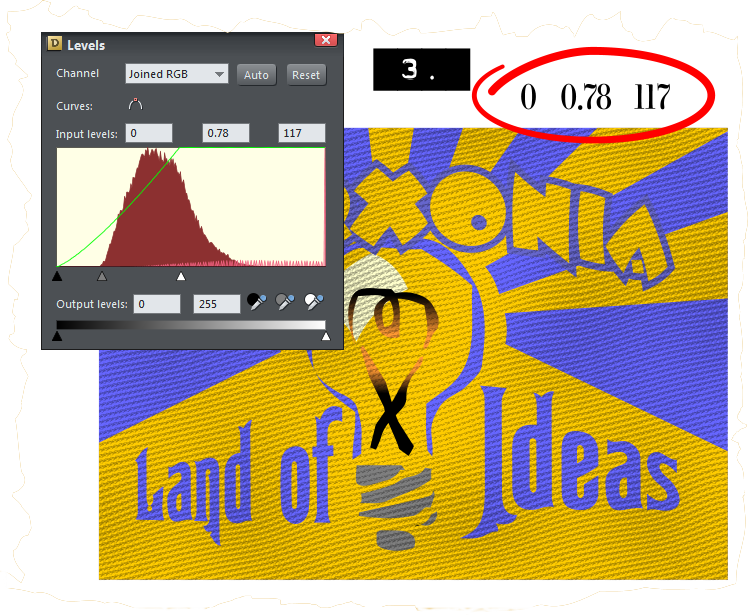
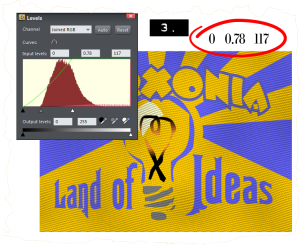 With the weave image selected, choose the Brightness Levels dialog from the Photo tools group on the toolbox. These are the approximate values to make the flag show through, but with added texture from the partially transparent weave image: for the Black Point, the Input Level should be 0; the midpoint should be about 0.78 so drag the middle slider to the left from its start position, and the White Point should be about 117—drag the right slider to the left. If these numbers aren’t working for you, drag the midpoint slider the left first to set a nice deep tone, and then drag the White Point left as a second step to brighten the image. It won’t be flawless; you’ll work progressively with the tonal values as the tutorial continues. See Figure 3.
- Select All (Ctrl+A), and then press Ctrl+Shift+C to make a bitmap copy of the partially transparent weave image and the vector flag group. Choose TrueColor from the Color Depth drop-down list on the Palette Options tab, and then hit Enter (or click Create. Hitting keyboard keys is more emotionally satisfying to me).

Save you work, and you can put the original vector flag and the bitmap weave to the side. To continue, you’ll only need this bitmap copy.
Continued Next Page: Dis Must be De Place (warping the bitmap)


