Pixel-Based Graphics and Resolution
I think we’ve heard the acronym “Deepy Eye” and seen “dpi” to the right of number boxes in programs so often, that image resolution and the knowledge of how it impacts on our work in Xara is not so good. Yeah, it’s “dots per inch”, and a little more of a push on many designers will provide “it tells you how big your exported file’s going to be.”
I’m writing this article today because:
A dot is not a pixel.
A pixel is not a unit of measurement in the same way that ounces measure volume and yards measure distance.
Writing about something that we think we’re assured of, but are at least partially wrong about is my idea of a fun time.
The problem with retouching photos and exporting Xara work to bitmap file type all boils down to the humble pixel. And it’s important to understand the structure of a pixel-based image if you’re going to accurately express your artwork to the web and to print. You want to use, edit, refine, and work with bitmaps as easily as you do with the features in Xara such as color replacement and Live Effects, so let’s go back a ways to definitions, limitations, and the structure of photographic images on your computer.
Pixel Artwork versus Vector Artwork
Although there are two fundamentally different types of graphics you can work with on a personal computer—vector graphics and pixel graphics—actually, 100% of the time what you see onscreen is a pixel-based graphic. Vector computer monitors were toyed with a decade ago to almost universal disapproval, so what you’re reading this article on is a picture-element (pixel) based system. If you’re running, for example, a 1280 by 1024 screen resolution, there are 1280 pixels across and 1024 pixels up and down to display text and images. Even when you work with path in a drawing program, what you’re seeing onscreen is a pixel-based representation, that vector applications render to your screen on-the-fly.
Vector artwork, for the most part the kind of art you create in Xara, is resolution-independent. This means that the vector art you create can be scaled up and down, rotated and distorted every which way and it still retains focus and its structural integrity. Vector artwork has its essentials, and everything else you add to the artwork in Xara is just a welcome bonus. In a nutshell, vector artwork has:
- a direction a path travels in
- the width of its outline
- its fill color(s)
Regardless of how complex you make a drawing, it can be explained and saved to file in math terms. And because math can divided and multiplied (150 × 2 = 300, for example), you can see that scaling a vector drawing doesn’t change its artistic values.
Pixel-based graphics, on the other hand, are resolution-dependent. This means that a finite number of pixels go into what you see on screen, and they cannot be increased or decreased without making a visible, fundamental change to the structure of such a graphic. This makes more sense if you think of the snapshot you took yesterday of a friend who was too far away from the camera. You can’t, in any program on Earth, make your friend’s face any larger and more detailed in the process because the picture has already been taken. You can’t ask your camera to take a bigger or closer picture after it and you have left the scene.
Pixel-based images (also called photos, pictures, images and bitmap images) contain a finite number of picture elements, it’s quite possible to irrevocably damage a pixel-based image, throwing it out of focus or adding artifacting (noise, corruption) by changing its size without changing its resolution.
However, the positives of pixel images balance the negatives: while it’s very easy to take a snapshot, it’s quite hard to draw (using vectors) something that looks exactly like a photograph. Pixel-based images can have depth of field, exposure, a source of scene lighting, and other properties. Many talented artists have created vector pieces that look almost like a photograph. Many of us also cannot invest the time and talent to “make photographs”. Fortunately, there’s an easy way to make your work in Xara Designer look more photographic in nature: you import a photograph!
Granularity
Before digital artists ever thought about this computer graphics ‘‘what is the resolution?” jazz, we were experiencing the phenomenon of image resolution from the moment we opened our eyes as infants. The human eye uses resolution that scientists call granularity, there are a finite number of photo-receptors in our eyes, and then our brain assembles the “grains” of image data from our photo-receptors into recognizable shapes. A friend of mine once commented on a print pulled from a 1200 dpi laser printer, “this is a really good print; you can’t see the dots!” He didn’t understand resolution from a physical aspect, but he expressed this granularity idea very practically. The granularity of our eyes makes a smooth continuous tone from a printed halftone, whose resolution is greater than our eyes’ resolution when held at arm’s length.
Bytemaps and Pixels
In 2014, we’ve grown accustomed to calling a pixel-based image a bitmap. However, the term bitmap is a little like the phrase, “Why don’t you dial me up sometime?” Telephones haven’t had dials in decades, and similarly, a bitmap—literally a map of bits of information—is inadequate at describing a pixel-based image, but bitmap is used as the term for non-vector graphics today regardless. We’re comfortable with the term and the term is described next.
Let’s say you have a JPEG onscreen right now, fresh off your camera. What are you seeing? No, no, of course you’re seeing a friend or relative, but what you’re really seeing is a finite number of placeholders for color—the number of placeholders for color is so large that your mind integrates the placeholders into a familiar image. That’s the “map” part of the term “bitmap”; this map could also be called a mesh or a canvas. All the bitmap images you take with a camera, or paint in a paint program are composed of information units all lined up in a grid. You don’t see the grid (nor the map part of a bitmap); it’s only a figurative thing, intangible…it’s the structure for the visual information, and the finer the grid, the less likely you are to see the individual color elements instead of your mind blending the elements into a photograph.
The “bit” part of the term “bitmap” is actually a byte of color information: the 24-bit graphics artists work with today have a byte (8 bits) of information with which to express a color value; it’s higher still when you get into 48-bit color. The term bitmap was coined in the days when a monitor could truly only display a color, or no color; thus the term bitmap, and the term has stuck with us for more than 30 years.
This unit of information that is lodged in a map is called a pixel, and again, a pixel is only a placeholder for a color value; it is not a unit of measurement, it doesn’t even have to be square (digital movies cameras take rectangular-proportioned movie pixels) and it has no fixed size. Other things a pixels is not include:
- A dot-Occasionally even professionals will lapse into describing the resolution of a digital image in dots per inch. This is okay if they’re using the term “dot” as slang to mean a pixel, but this is confusing jargon. Printers print dots of toner and other pigment onto a surface (usually paper); a 1200 dpi printer, for example, renders 1,200 dots of toner per inch of paper, but it is not rendering 1,200 pixels per inch of toner! In fact, a 1200 dpi laser printer is incapable of rendering 1200 pixels per inch (ppi). A pixel is not a dot of toner or ink.
- A screen phosphor or LED– Pixels that make up an image do not correspond 1 to 1 to whatever the elements on your monitor are made of. With high quality images, there are far many more pixels per inch than there are light units (phosphors, LEDs, and so on) on your screen. This is why Xara and other programs offer a Zoom tool, so you can see the true 1 to 1 resolution of an image that otherwise would not fit on your screen. Typically, we measure screen resolution as anything between 72 pixels per inch and 96 (again, this is called ‘dpi’ by manufacturers), but today mobile devices, have even greater resolutions, for example the Apple’s iPhones with 326 ppi and the LG Quad HD with 538 ppi. Images shown on today’s more expensive mobile devices look crisp and without a hint of visible pixels. However, mobile screens are still resolution-dependent and one of the reasons why images look sharper on a mobile phone is because the screen is a fraction of the size of your monitor! Image resolution is inversely proportional to size as measured in real world units such as centimeters and inches. I’ll get to this true-ism later in this article.
- Any sort of ratio—The measurement we commonly use in bitmap evaluation is pixels per inch, which is a ratio, like mph is a ratio-miles (one unit) per hour (a different unit). A pixel is a unit, but not a ratio, and therefore if someone says they have an image that’s 640 by 480 pixels, they’ve told you how many pixels are in the image, but not its resolution, and not its size. A pixel is a unit, and needs to be contextualized if the number of pixels in an image is to have meaning to someone printing your work. For example, 120 pixels per inch, or 300 pixels per centimeter—now this unit, this color placeholder—becomes meaningful and useful to a printer or designer. You wouldn’t brag to a friend that you were speeding—bombing around in your new Mustang at 120 miles. Now, 120 miles per hour is a different story completely. It’s meaningful, it’s in context, it describes a complete measurement, and it’s against the law in most states.
Resolution and Resolution-Dependent Images
As mentioned earlier1 resolution is expressed as a fraction, a ratio between units (pixels) and dimensions in the physical world such as inches (we Yanks tend to prefer inches to decimal). Now that we have a working if not practical knowledge of resolution, it’s important to consider which file types for export as bitmaps support image resolutions: some do and others don’t.
- BMP
- The Windows Bitmap Picture file format can support image resolution, but doesn’t always because it all depends on whether the programmer who writes Program X decides the written file should contain image resolution info, or default to screen resolution (usually measured at 96 pixels/inch). File formats are part of an exchange: one program writes a file type, and then it’s up to Program Y’s programmer to include a feature that recognizes things such as resolution, image color space, alpha channels and so on. Microsoft Paint, for example, has no facility for saving image resolution—the interface contains no rulers, and when you write a BMP file out of it, it’s typically n pixels wide, n pixels tall, and 96 pixels/inch. You have no way on knowing what the intended dimensions as measured in inches or cm are. On the other hand, Adobe Photoshop and Xara can both include resolution information within the BMP file format, so an accurate exchange between these two programs is a successful one. As a rule, if a program doesn’t have rulers, such as Chaoscope, when you export the rendered file to BMP, it’s going to default to screen resolution, 96 dpi.
- PNG
- Retains image resolution
- TIFF
- Retains image resolution
- PSD
- Retains image resolution
- GIF
- Doesn’t retain resolution. Defaults to screen resolution.
- JPEG
- Retains image resolution, however some programmers don’t use the capability.
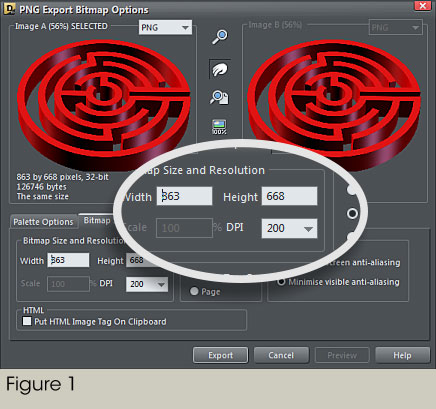
The good news is that all the above file formats can be exported with accuracy from Xara to another program, and can be imported to Xara at exactly the same size and resolution at which the file was created. In Figure 1 here, I’m exporting a vector drawing to PNG, with transparency, at 200 pixels per inch (okay, dpi) just for the heck of it, to see how Adobe Photoshop interprets the image.
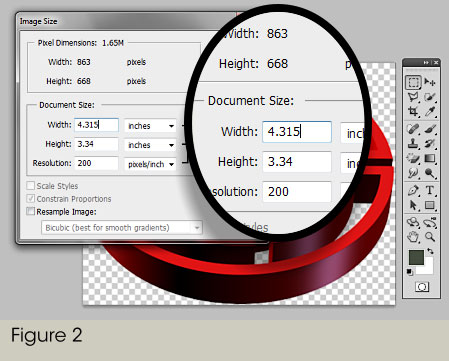
Lo and behold, this resolution thing kinda pays off, because Photoshop recognizes this exported bitmap as exactly the same size and number of pixels as it was exported from Xara, as shown in Figure 2.
Resolution and Physical Printing
If you have a home printer, chances are that it’s an inkjet. Inkjet printers do not print halftone dots the same way a PostScript device (an imagesetter, a high-res laser printer) does. The print heads more or less spray pigment onto a page, the page allows some pigments to mix, and also inkjet printers have resolution, the colors while printing blend together, hiding the fact that whole units of pigment are ordered on a printed page.
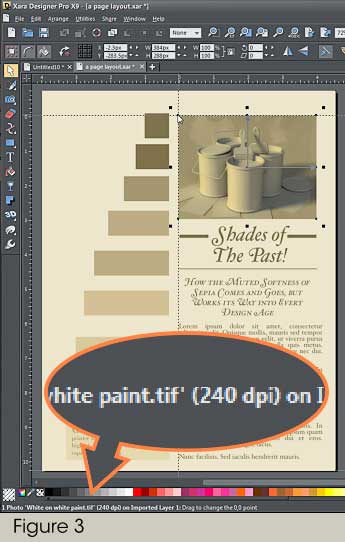
Now let’s say you have a page in Xara, a text and photo and vector design combination. One of the great things about Xara is that as a resolution-independent shape creation suite, Xara sends vector graphics to a printer or other output device at the highest resolution the printer is capable of handling. Text is based on vectors, too, so you’re always assured that when an object doesn’t depend on resolution, it will print crisp and faithful to your design. A photo in the composition, however, requires that you consider the resolution of the picture and the resolution of the bitmap on the page. It’s easy in Xara to discern the current resolution of an image: when selected, the left side of the Status line tells you, as shown in Figure 3.
Printing Bitmap Images
The rule is that an image’s resolution should be in the neighborhood of your printer’s resolution. Therefore, let’s say for example that you1ve imported a photo and you know by looking at the Infobar with the bitmaps selected and then at the Status Line—that it’s 4″ wide and 3″ tall and 250 pixels per inch in resolution. Your next move is to check the printer manufacturer’s documentation. Although manufacturers tend to tap dance around specific printer resolutions, a good working guide is that an ink jet prints about one-third of the stated overall resolution on the box. If the box says the ink jet is a “720 dpi enhanced resolution” disregard the hype about “enhanced” and cut to the chase: a 720 dpi (dots per inch, not pixels per inch) ink jet can render about 240 pixels per inch. Therefore in this example, you can indeed faithfully print this 4″ × 3″ image with no loss in image detail.
Outputting from Xara to the Web
With the exception of SVG graphics, which are vector in nature and drawn to screen on-the-fly as a bitmap, and swf files which are on the decline due to the inability of mobile devices to display them, you necessarily need to export your Xara work as a bitmap if you’re going to hang it up on the web. If your work is entirely vector, exporting to the correct dimensions and resolution is a no-brainer. Suppose you’re working with the standard that monitors display 96 pixels per inch as standard resolution. You select all the shapes in your composition (or group them first), then take a look at your web page layout. How wide or how tall is the space you are allotted for the graphic?
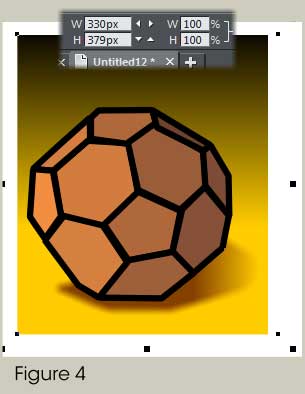
Let’s say you have 225 pixels in width for your graphic on the web page (and don’t need to care about the height). Great: you’ve created a graphic that measures 330 pixels wide as shown in Figure 4, and having read this essay so far, you understand that as a resolution-independent computer graphic, you can scale this picture down to 225 pixels and export it with no problem whatsoever.
Let’s cover the wrong way to do this simple task, I’ll show you why it provides lousy image results, and then I’ll show you the right way to export a Xara vector graphic to bitmap file format.
Remember, this is the wrong way. Don’t do this at home. With the shape(s) selected, you press Ctrl+Shift+E (File>Export in later versions of Xara), and name the file in its destination, and choose JPEG from the Save as Type drop-down, good so far, and then you click Export.
In the JPEG Export dialog, you click the Bitmap Size tab and type 225 in the Width field, the Height obligingly adjusts to a proportionately scaled Height, and you think you’re all set to click Export.
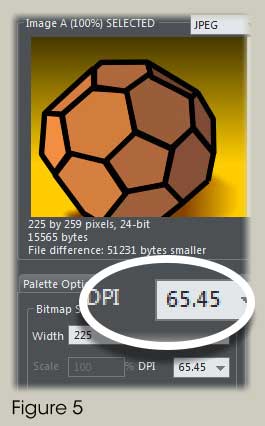
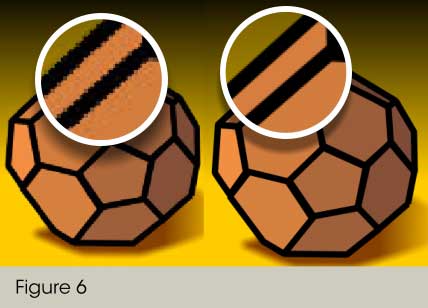
Stop. Do not Pass Go…take a look at the Resolution field. In Figure 5, you can see that it’s not only not 96 dpi—your desired resolution for this web page, but 65.45 is also a fractional amount. It’s not a whole number, and although paint programs can use fractional amounts for computational stuff such as blur filters, eventually a bitmap image has to be quantized to whole pixel numbers. Yes, Xara will indeed export this image to 225 pixels across at 65.45 dpi, but you ain’t going to like it. Do something like this experiment, and then bring the bitmap image back into Xara and look at it at 100% zoom level, which is 1 to 1 monitor resolution. Figure 6 shows the folly at left and what you should have achieved at right, if you ignored the preceding failed experiment and continue reading for the professional way to export vector graphics to bitmap.
Okay, rewind and let’s do this export the right way:
Select your drawing, and do your desired scaling in Xara, not in any bitmap export box! This is when you make the size of the future bitmap fixed. And if the Width is 225, and the Height is a fractional amount up on the Infobar, it is not a concern the way you’ll export the image doing it this way, as follows.
Select your vector drawing, and then press Ctrl+C to copy it.
From File, choose New>Blank Photo. Your vector drawing isn’t a photo (a bitmap) yet, but this New file type has a special feature—it rounds, it negates fractional amounts.
Do the Ctrl+Shift+E thing again and export the selected design to PNG or JPEG. JPEG sometimes introduces a little artifacting where there is an abrupt change in pixel color in neighboring pixels, but PNG doesn’t lose original pixels values and hence is better quality but larger in saved file size.
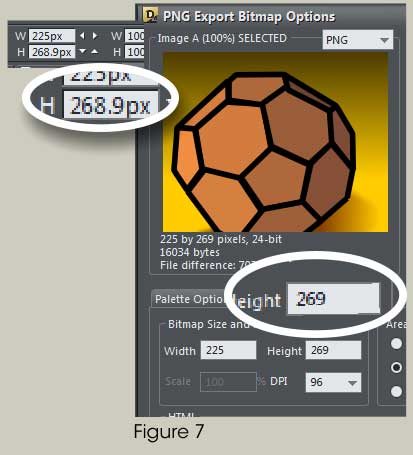
Check out the Width and Height values in the output boxes. There are no fractional amounts, as shown in Figure 7. What is happening here is Xara is quantizing (clamping) a floating point value to a whole number value because image files can save digital information, but no floating point—continuously adjustable—values. You export, and life is good.
Resampling Versus Resizing
The important thing to remember is that in your career or hobby, eventually you’re going to need to wind up with a Xara vector drawing as a bitmap copy. And the thing about bitmap images is that wherever possible, resize and do not resample the image if it doesn’t fit your layout. Now, the two most common avenues for displaying graphics work are the web, and commercial printing. I just covered exporting a vector drawing to bitmap in the previous section, but when you’re dealing with a photo and need to export it, you should probably do so for printing and not for web work.
Why? Because when you change the dimensions of a photo without changing the resolution, you’re doing one of two things:
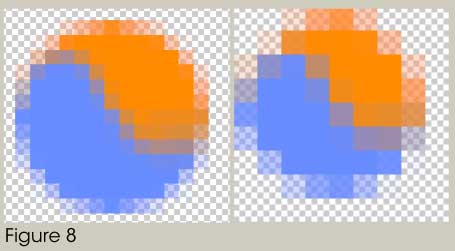
If you’re making the bitmap smaller, you’re probably cool to get away with Xara’s (and other design programs’) methods of removing pixels from the image while maintaining the visual integrity of the photo. Think about this: if you have an intelligent program such as Xara, and you command it to make a 32 × 32 icon only 14 × 14 pixels in size, you’re asking it to resample the bitmap, and go from 1,024 total pixels to 196 pixels, throwing away about 800 pixels. So what the program does is create the new size, and the visual data—each pixel—is given a new color based on the average of pixel colors next to any given pixel. This keeps the look of the reduced size icon smooth in appearance like you can see in Figure 8, where I’ve resampled a 16 × 16 pixel icon down to 9 × 9. You can clearly see that the remaining pixels aren’t the same as the original colors; they can’t be, but Xara has intelligently recolored these new pixels to basically represent the most attractive new resampled images as possible.
If you want to make a bitmap larger, largely? You’re out of luck, because a computer program can’t add pixels to an existing image without having been right next to you, watching the same picture you’re photographing and taking down notes. I’m somewhat kidding here; you can’t up-sample a bitmap without introducing blockiness, as the program creates large areas based on the same (or similar) pixel colors as the original’s. Now Xara has a technique in Options, on the View tab under Bitmaps, a checkbox called Never Smooth. I suggest you leave this box checked because more often than not you need to see something clearly in a digital photo so you can retouch it. If you leave Never Smooth unchecked, Xara does its best to smooth out the inevitable rough image areas when you upsample (scale up) at bitmap, but ultimately the image loses some focus because Xara is gently blurring the image to hide the rough pixel edges between contrasting colors.
You are really best off, if it’s your job making bitmap images larger, to buy an expensive, proprietary program such as Benvista’s PhotoZoom, that uses some very tricky techniques to swap artificial (fractal) visual information into an enlarged photo. Alien Skin has an upsampling program, too, and I confess that I’ve used one of these programs in the past, but the artistic purist in me says, “Don’t do it.” Because the most critical of professional eyes can see, even with an expensive upsampling program, that it’s not the original bitmap photo.
Anti-Aliasing: The Good and the Bad
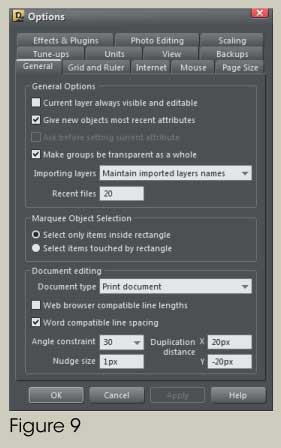
Xara has an exceptionally good anti-aliasing engine, and it’s particularly strong when you zoom in and out of photos you import. Look at this screen cap done of Xara’s interface, zoomed out to 75%. (See Figure 9.) It is a perfect example of how a program should reduce the number of pixels, smoothly, yet with clarity so you can actually read what’s on this Options menu! I tried the same thing with Photoshop CS5.5, by manually reducing the screen capture to 75% (because dropping the zoom level to 75% in Photoshop makes the image look like crap, and I’m not dumping on Adobe here), and got about the same results except Photoshop’s Bicubic (Sharpen) filter made the resulting image more coarse than simply screen capping the Xara UI at a reduced zoom level.
Resampling an image, we should conclude, takes into account something called Anti-aliasing. Now, “Anti” usually precedes something negative, but anti-aliasing is actually good in computer art. Let me explain anti-aliasing with a visual example in a moment.
Xara Designer was built from the ground up to make your design work look good onscreen. In fact, for a lot of what you see when you work in Xara, the program is ignoring Windows rendering algorithms (“recipes” in math) and is using its own rendering engine. Part of the wonder of this rendering is that your designs really do look better onscreen and look better if you export them to bitmap correctly, because Xara was the first drawing program to introduce anti-aliasing, a pixel-level adjustment of pixels that lie on the edge between two other color-contrasting pixels. For example, if you had a checkerboard drawing that extended in perspective to infinity, at some point there would be two contrasting colors on the checkerboard that need to occupy the same pixel, they’d have to. Decades ago in the infancy of computers and computer graphics, this “two different colors need ot occupy the same pixel” dilemma was resolved by choosing one color or the other. Technically, this color is wrong, it’s going under the alias that it is the correct color for this one pixel. Anti-aliasing reconciles the 2 color in one pixel problem by intelligently weighing the average difference between the two colors and then creating a third color, a color blend, to occupy that one pixel.
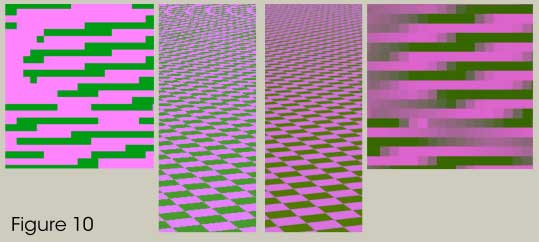
And this anti-aliasing works! It’s neither mathematically correct nor incorrect; it’s art, and it works. Look here at Figure 10; at left, I created a checkerboard pattern in perspective and rendered it without anti-aliasing. The close-up at left shows jaggy areas that no way, no how, represent alternative squares of color. However, with anti-aliasing turned on at right, there is a gradually transition across a few pixels that smooths the areas where the “either green or pink” visual dilemma cannot be resolved artistically and aesthetically.
Xara’s anti-aliasing might sometimes cause a problem in web work that is easily eliminated: don’t use fractional amounts for the width or height of a design you want to export. Xara interprets, for example, 63.4 pixels in width as 64 pixels when the saved file format requires the whole integers. And Xara accomplishes this rounding off by anti-aliasing the edge of your drawing color with the background color. And your final product is going to look like this on a web page. (See Figure 11).
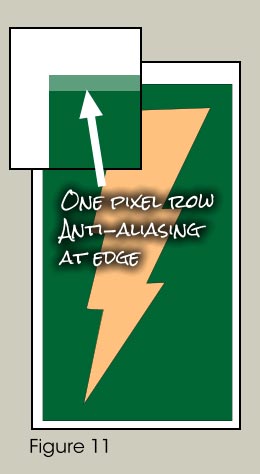
This is a needless headache. Just make sure that you export your designs using the New Photo template, or make absolutely sure you check the Infobar twice to see that your selection is 200 by 300, and not 200.2 by 300.7 or some such.
When printing, Resize, Don’t Resample
I’m beginning to run out of pixels, so I should wind up this essay with a thought on printing output and the difference between resampling and resizing. Resampling changes the number of pixels in a saved bitmap image, and I’ve shown you the potential hazards of doing this. But resizing, in the real world with physical prints of your work, preserves the integrity of your bitmap work; vector drawings don’t experience output problems because they are independent of resolution.
My suggestion is you have a photo that is too small in resolution (it has too few pixels) to be output to an imagesetting device, is that you go back and take another photo, or you increase the output size of an exported vector drawing. Your only other choice is to reduce the output resolution of your physical print, and that’s sort of like going back to 1960s newspapers where print resolution was something like 80 dpi (laughable by today’s 300dpi and higher standards). And if your output is going to be 300dpi, let’s say, but an image on your page in Xara is 450 dpi at its desired height and width…leave it alone, and I’ll explain why right after this important revelation:
Image resolution is inversely proportional to dimensions.
When you make an image larger in dimensions, its resolution decreases. And this is why making a 96 dpi image larger in dimensions on a page just so it fits your design leads to sucky output. On the other hand, if your image is just the right size on the page, let’s say 3” by 3” and the Status line tells you it’s 415 dpi, but your output to laser printer or whatever is only 300 dpi, you leave the image alone. The printer is going to chew through the data to be printed, it discards excess data in a way you never see in an image of too-high resolution, the printing takes two seconds longer as the printer compensates for too much data, end of story. If you resample the photo so it’s only 300 dpi, your print time might be shorter, but you’ve changed the number of pixels in the photo, and by doing that, it won’t look as good as your original.
Fortunately, in Xara, when you scale a photo down, you are not changing the number of pixels. Xara is obeying the image resolution being inversely proportional to dimensions mantra.
Example? 3264 pixels × 2448 pixels is average for an 8 MegaPixel camera; a little larger than 10″ by 8″ at 300 ppi. And this might get you a 14″ by 10″ image (an approximation here!) at 225 pixels per inch, which is enough to squeak by on many inkjet printers while retraining a smooth photographic look.
Know when to resample, try to always resize, avoid unwanted anti-aliasing and make understanding resolution in your work a priority, because you want the world to see your wonderful work exactly the way you created it.
My own resolution was to give up chocolate the first of the year, but somehow it didn’t work out.
has been drawing with traditional tools for almost 40 years, and with digital tools such as Xara for close to 20. As large a fan as he is a practitioner, Gary encourages others to express themselves artistically through his writing, the over 25 books on graphics he’s had published, through the videos and tutorials he creates for The Xara Xone, and through his online school, Exclamations. You can send him some email, visit his personal website, or better yet drop on over to the Xara Xone Forum on TalkGraphics and talk to Gary and the rest of the Xara community.


