


A Tips and Trick Guest Tutorial by Larry Leiker (wizard509 online)
Using Noise (instead of water) to Make Animated Snow
Download April-2012 Snowfall-tutorial-files.zip A while ago I was asked to make an animated snow scene, and the client told me the final product had to be a GIF file. I thought I’d share this simple and effective technique with the Talk Graphics community this month.
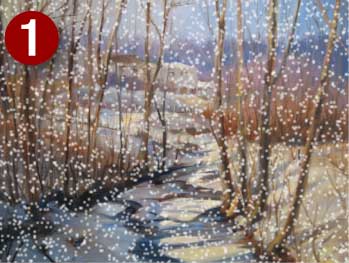
The animated snow sort of has to go in front of a scene to make it visible (see Figure 1), so you can use your own image, or use the one I’ve provided, Background Scene.png. If you’re using your own photo or graphic, try to use one that contrasts against white, making the snow easier to appreciate as it wafts down the scene. Because the final animation will be a three frame GIF, to conserve file size (so the animation plays quickly on the Web), keep the maximum dimensions of your background down to no more than 350 px wide and about 250 px high.
Let’s run through the steps now:
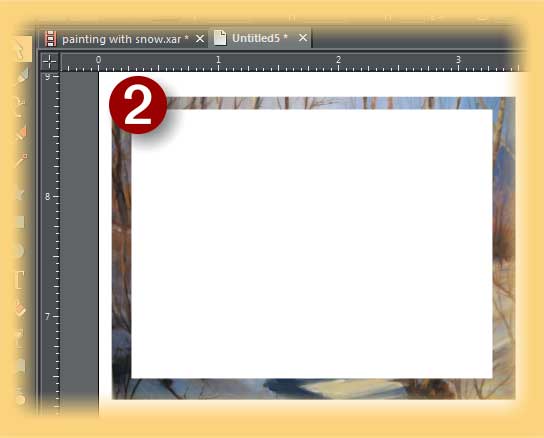
- Create a smallish white rectangle. It should be smaller than the image to which you want to add snow. But because the dots playing the part of the snowflakes are going to be very small due to the method I’m showing, you’ll eventually enlarge this rectangle, so make the rectangle perhaps 90% of your background image, and we’ll be making the snow shape larger later. See Figure 2.
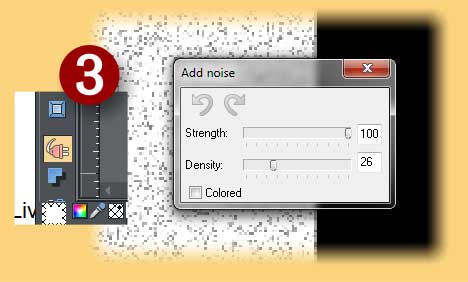
- Add noise. With the white rectangle selected, click the Live Effects button on the Toolbox, and then click New on the Infobar, and choose Distortion Filter/Add Noise. Try the Strength setting of 100 and a Density of 26. Uncheck Colored to render only grayscale Noise. See Figure 3. You can close the Noise dialog box now.
- With the noisy rectangle selected with the Selector tool, press Ctrl+Shift+C to make a copy of the rectangle. Because Live Effects are dynamic, it’s impossible to edit the bitmap itself as a noisy rectangle. Making a copy frees up this copy for editing and you can delete the original at any time.
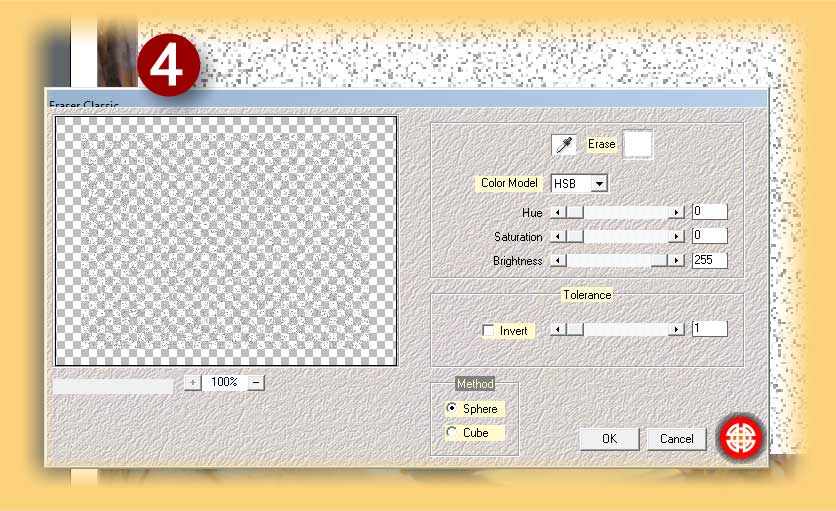
- Choose the Live Effects button on the Toolbox again, and then choose New> Mehdi>Eraser Classic. Zoom way into your composition and you want white to be the target color so click over a white area in the rectangle, or select white by clicking the color swatch to go to the system color picker. Click OK, and your rectangle should now look like a fine powdery snowfall. See Figure 4.
- Press Ctrl+Shift+C to make a copy of this snowy rectangle, make sure True Color+Alpha is chosen in the Color Depth field, and then click OK. You should delete the Live Effect version of the rectangle and then position this new copy over the scene background.
- Now the snow is still a little dirty because Mehdi Eraser Classic couldn’t remove all the black areas. So with the snowy rectangle selected, choose the Photo Tool.
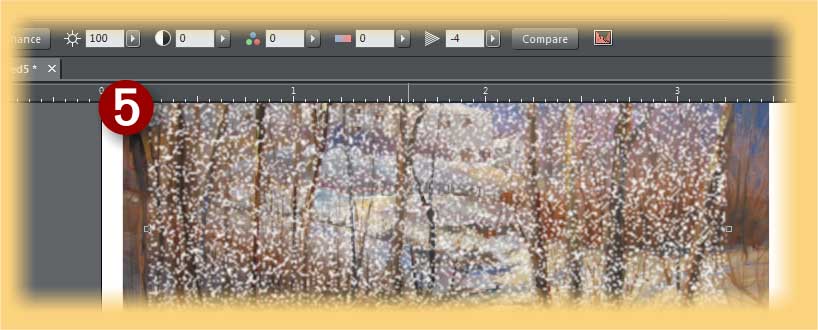
- On the Infobar, set the Brightness to +100, set the Sharpen/Blur to -4 (blurry and an amazing transformation will take place. See Figure 5.
On To The Animation
You have your resource files, so it’s time now to get to the animation.
- Make the noisy snow about 120% of the background image.
- Create a new Animation document.
- In the original document, copy the background scene and the snowy rectangle, then paste both shapes into the new animation document. You’ll see that the background of the document is larger than the background image.
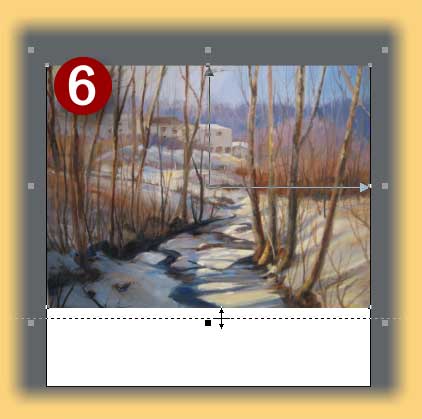
- Move the snowy rectangle off to the pasteboard, and then position the background image at the top left of the page. Drag the right, and then the bottom page border so they meet the background image. In this animation, anything outside of the page will not be included in the animation. See Figure 6.
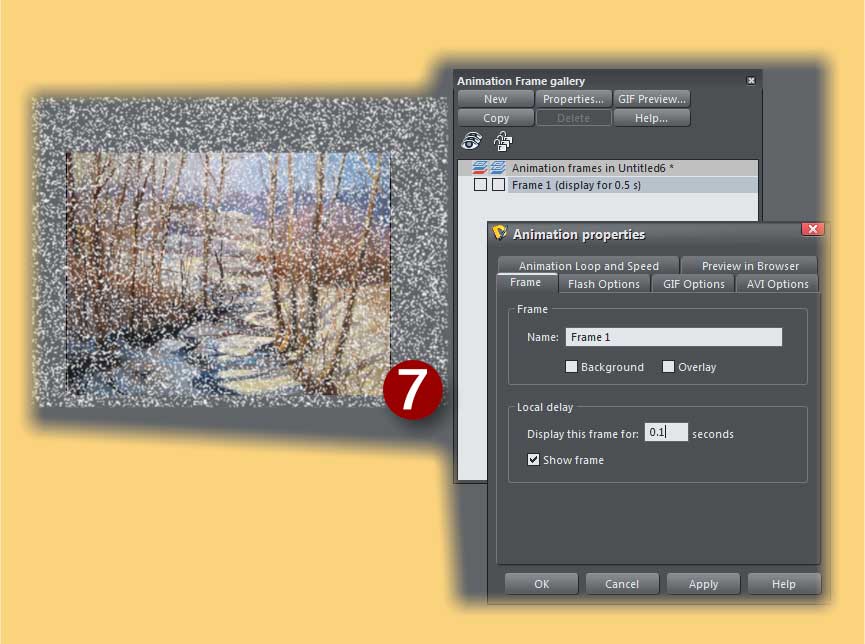
- Put the snow over the background image. On the Animation Frame Gallery, double click the Frame 1 entry to open the Animation Properties box. Set the duration in the Local Delay area to .1 seconds instead of the default of .5. Click Apply, OK, and you’re back to the animation. See Figure 7.
- Click Copy on the Animation Frame Gallery. Now select the snowy rectangle and use the keyboard arrow keys to nudge the rectangle down and to the right. Because the default nudge value in Xara Designer is 1 pixel, press the down arrow key 15 times (15 pixels) and 3 nudges (pixels) to the right). See Figure 8.

- Repeat Step 6, and in the new frame 3, nudge the snow rectangle 15 pixels down and 2 pixels to the left.
- Click the GIF preview button on the Infobar. If you like what you see, back in the document, click the Export GIF button. If you don’t like what you see, this is only natural, because it’s April and there shouldn’t be any snow…
- In the Export Animated GIF box, click Options.
- In GIF Options, make the Number of Colors 256 and choose Error Diffusion to disguise the fact that there are hundreds of colors in the background image but only 256 in this document. Area to Save is Page.
- Click the Animation Loop and Speed tab. Click Loop Continuously, and basically you’re good to go. Click OK to exit the Options box. Find a destination folder for your animation, name the animation, and then click Export.
The finished Xara file is in the zip archive, as is the GIF animation, also shown here.

You can post examples of how you’ve put this tutorial to use, or ask questions or just give a hearty thanks to Larry in the Xara Xone fourm on TalkGraphics.com in this feedback thread.

(wizard509 online), found Xara and TalkGraphics in 2002 and has been a huge fan of the software since. He now spends most of his time using XDP7 and on TalkGraphics where he is now a moderator.
A Marine Corp veteran, Larry attended Art School after his discharge. He went on to work as an Architectural Delineator, and is still a semi-professional magician. Born and raised in central Kansas, wizard509 currently lives in Missouri and continues to be a Moderator at TalkGraphics.
Be sure to stop by the Xara Xone forum on Talkgraphics to thank Larry (wizard509), ask questions about the tutorial and show him and the TG community how you’ve put what you’ve learned here to use.The tutorial Using noise (instead of water) to make animated Snow including the artwork and the downloadable examples file are Copyright © 2012 Larry Leiker. All Rights Reserved.


